と言う方へ。
解説を書いてあるようで具体的な操作を書いていない情報に今日もひっかかってしまっていることでしょう。
スクショ取りながらはじめてのazureのwebサーバーの環境構築を解説していきますね。
一応.NETでのアプリケーションを想定しています。
1.Azure登録して、画面右上のアイコンからazure portalをクリックしてazure サービスの一覧を見れます。
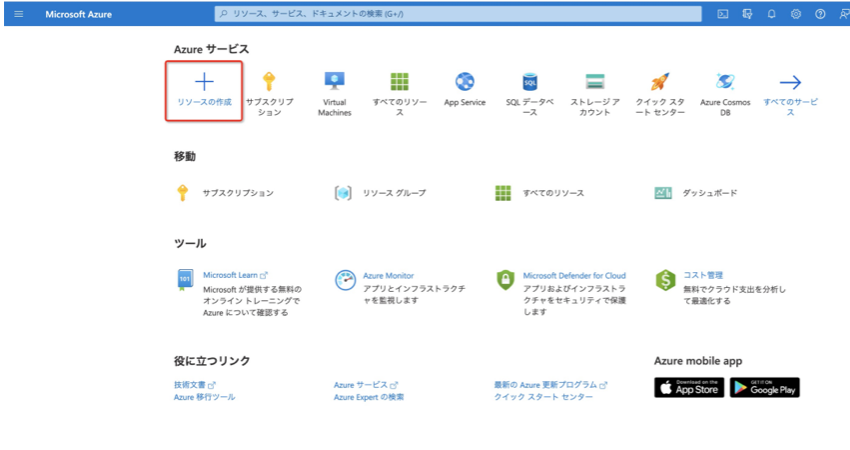
左上のリソースの作成をクリックします。

Windows Server 2019 Datacenterの製品を見つけ、下の【作成】をクリックします。
そうすると、仮想マシンの作成ページになります。
【基本】に下記のように入力します。
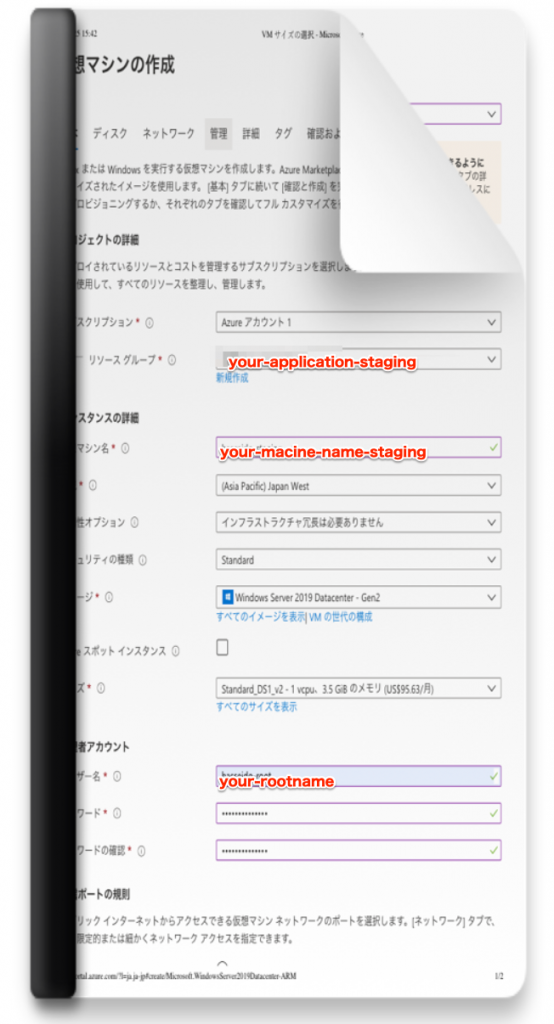
※管理者アカウントのユーザー名とパスワードを設定しましたら、メモしておいてください。リモートデスクトップに登録するために使います。
入力しましたら、【次:ディスク】をクリックします。
【ディスク】 下記のように入力します。

入力しましたら、【次:ネットワーク】をクリックします。
【ネットワーク】下記のように入力します。

入力しましたら、【次:管理】をクリックします。
下記のように入力します。
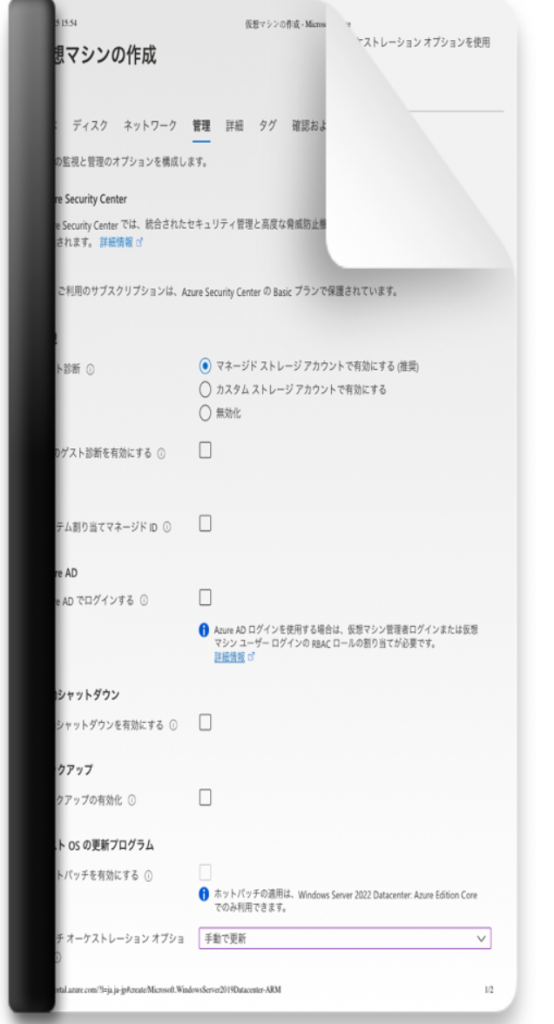
入力しましたら、【次:詳細】をクリックします。
【詳細】下記のように入力します。
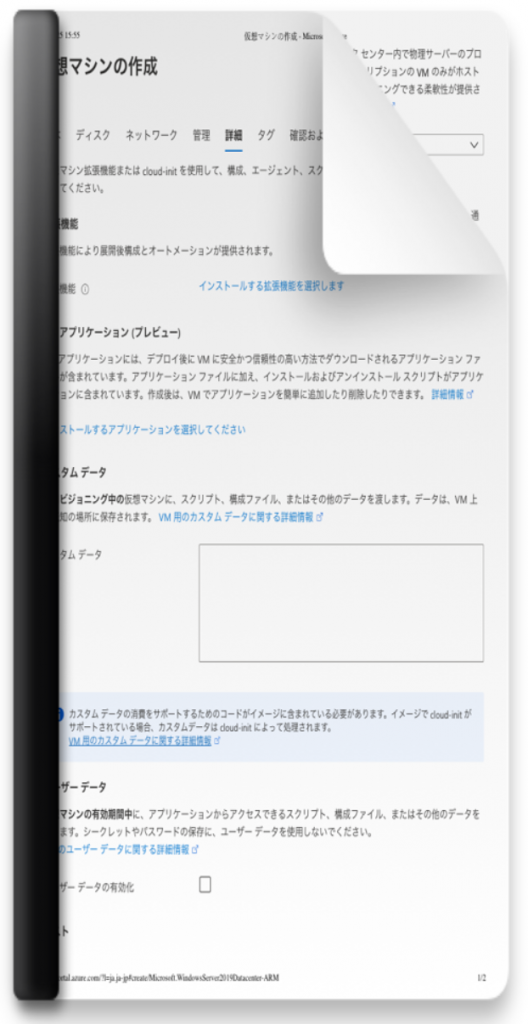
入力しましたら、【次:タグ】をクリックします。
【タグ】下記のように入力します。
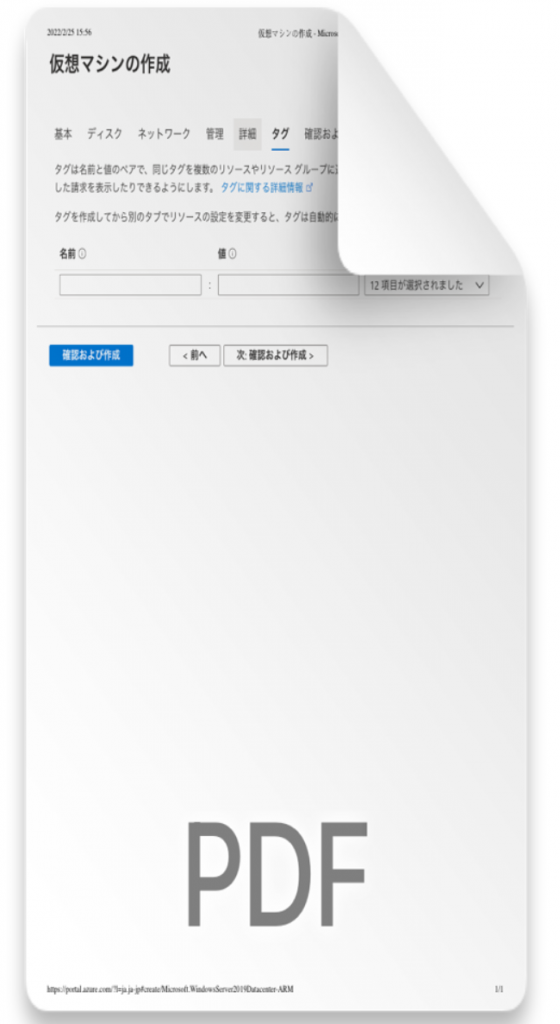
入力しましたら、【次:確認および作成】をクリックします
【確認および作成】
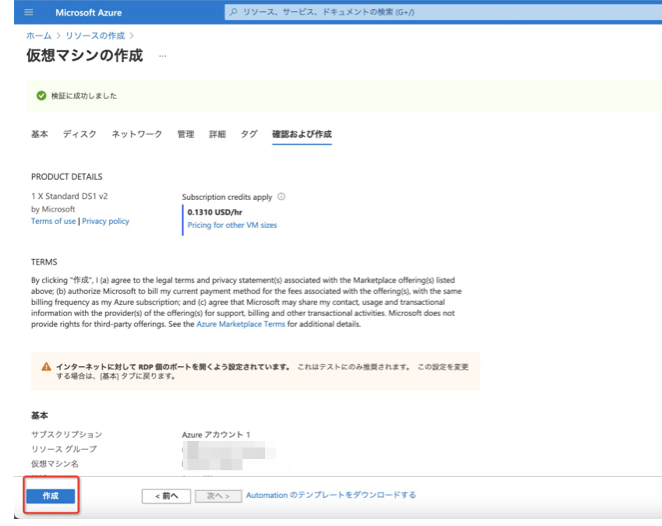
確認して、【作成】をクリックします。
クリックした後、1~2分をお待ちして、下記画面が出ていたら、サーバー配置が成功したことになります。
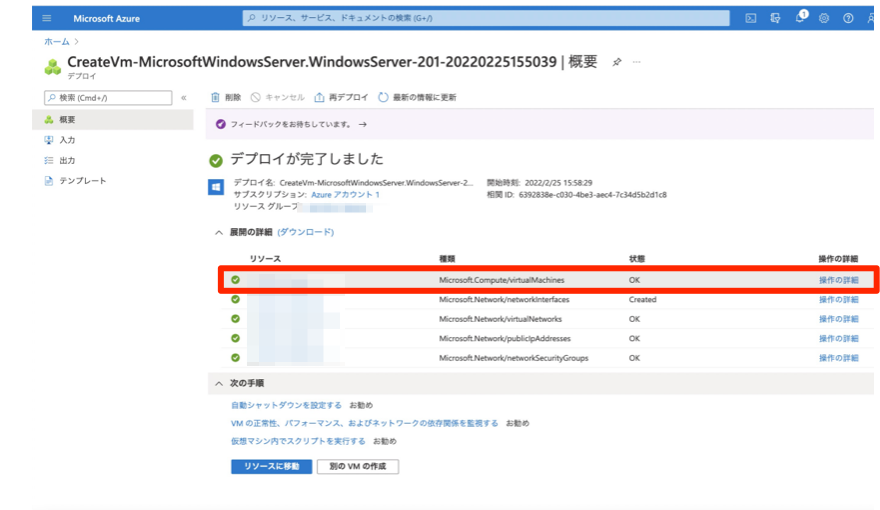
赤い枠のところ(自分で名付けたリソース名)をクリックします。
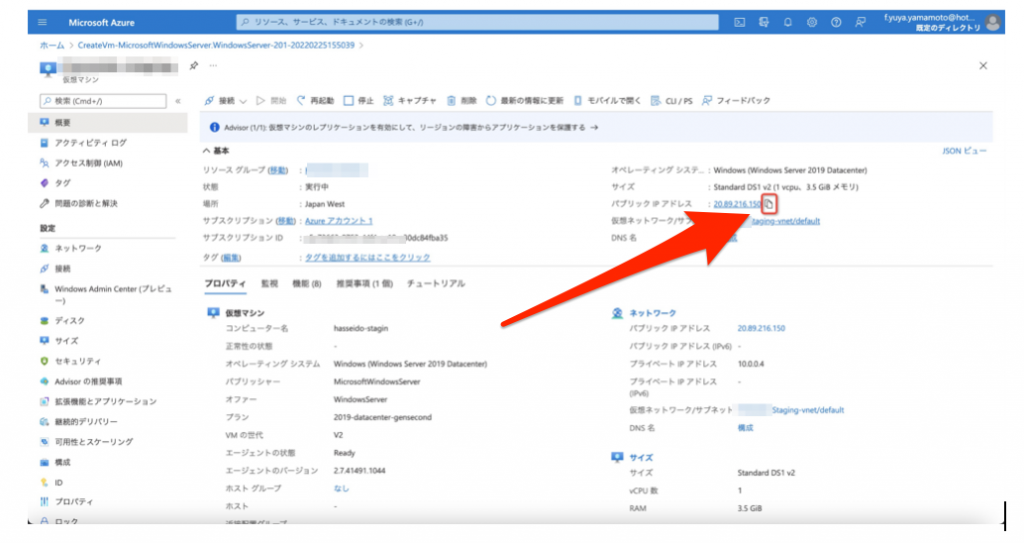
赤い枠のところのコピーマークをクリックして、IPアドレスをコピーします。リモートデスクトップに登録するためです。
サーバーにてシステム設定する
リモートデスクトップに登録します。
おなじみの遠隔操作機能ができるツールを使います。
(ここはMicrosoft Remote Desktopを利用しています、
storeにてMicrosoft Remote Desktopを検索しインストールしてください。

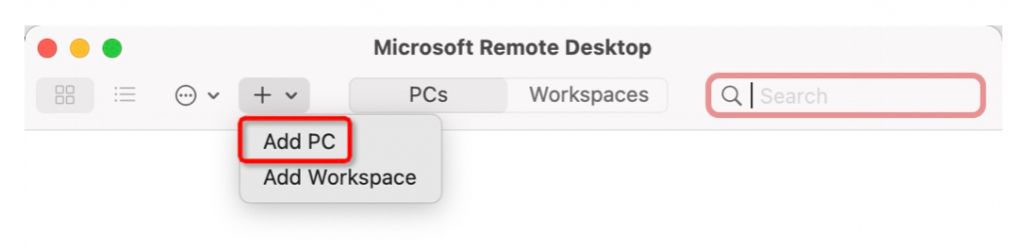
【add PC】をクリックします。
(上のプルダウンからクリックしてもOKですし、
画面のボタンをクリックしてもOKです。)
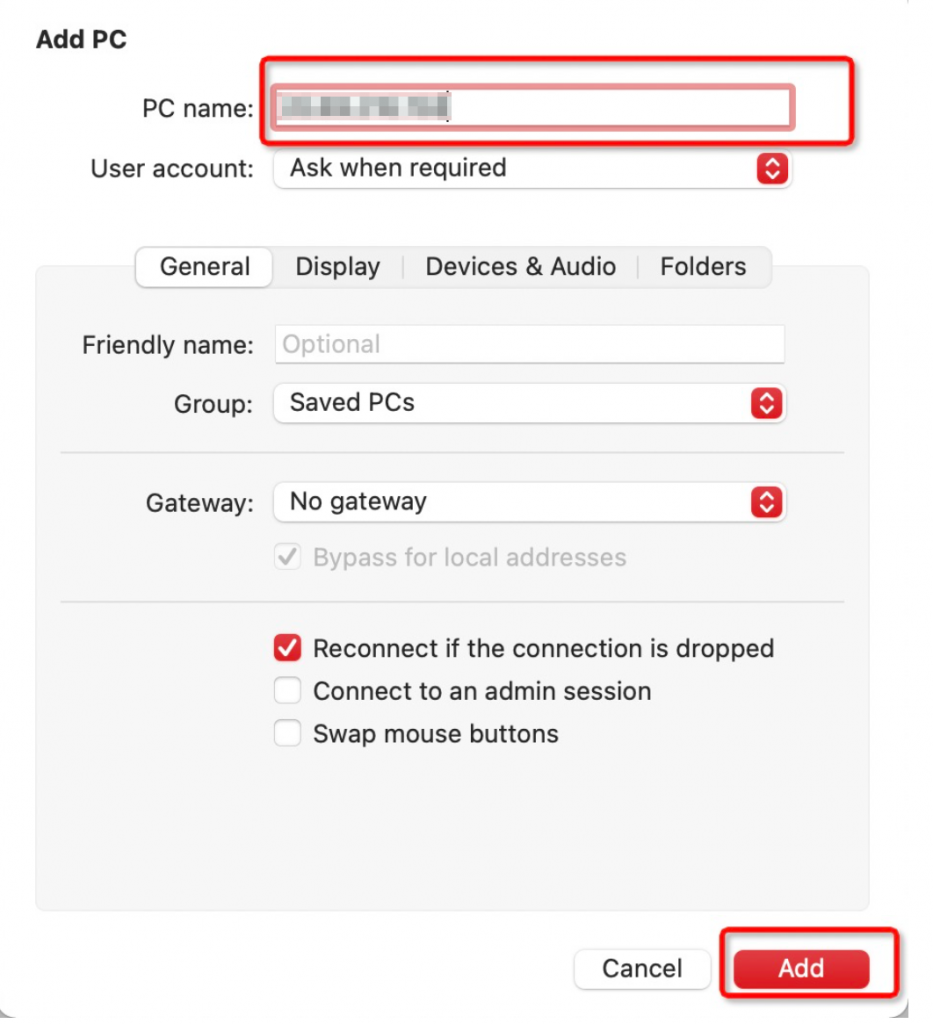
こんな感じで、

先ほどコピーしたIPアドレスをペーストして、
【Add】ボタンをクリックします。
赤い枠のところをダブルクリックします。
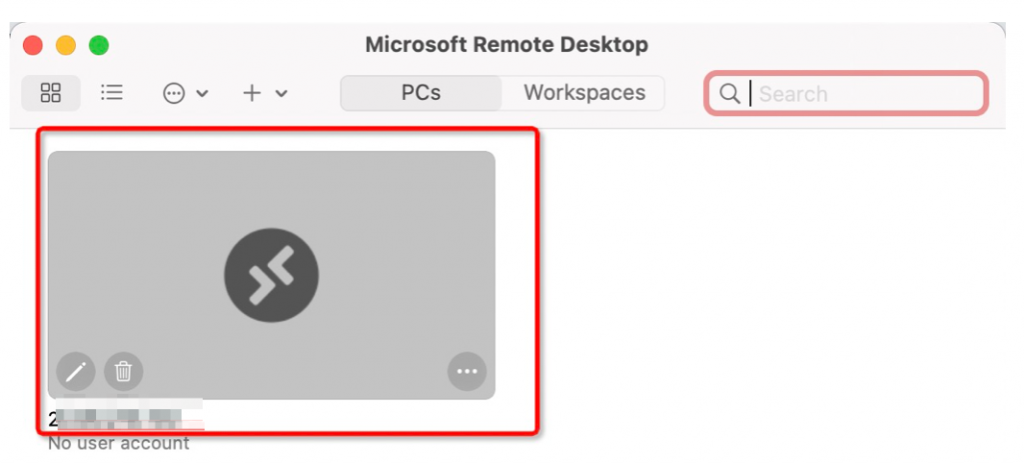
UsernameとPasswordを入力して、【Continue】をクリックします
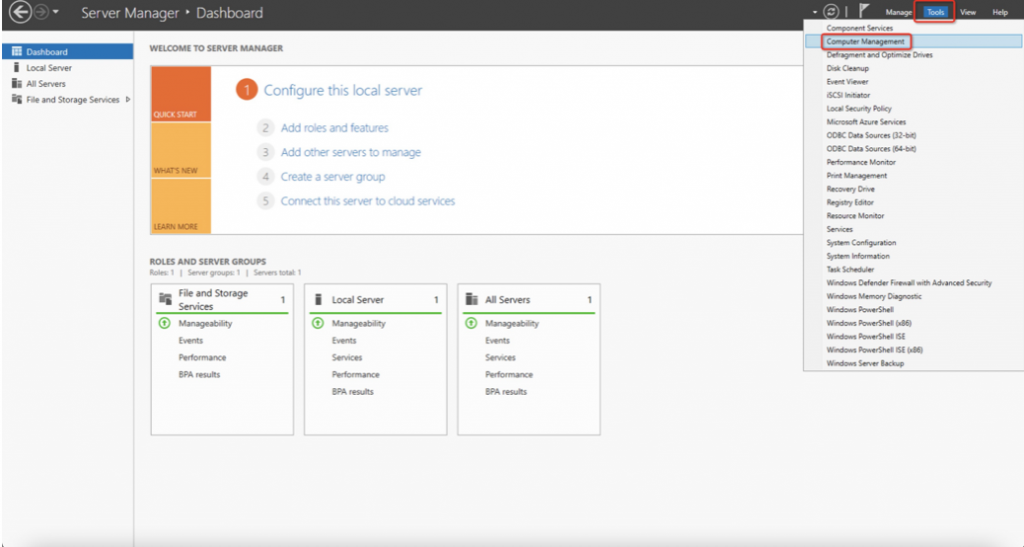
次にパーティション分割をします。
右上のTools ->Computer Managementを選択してクリックします。
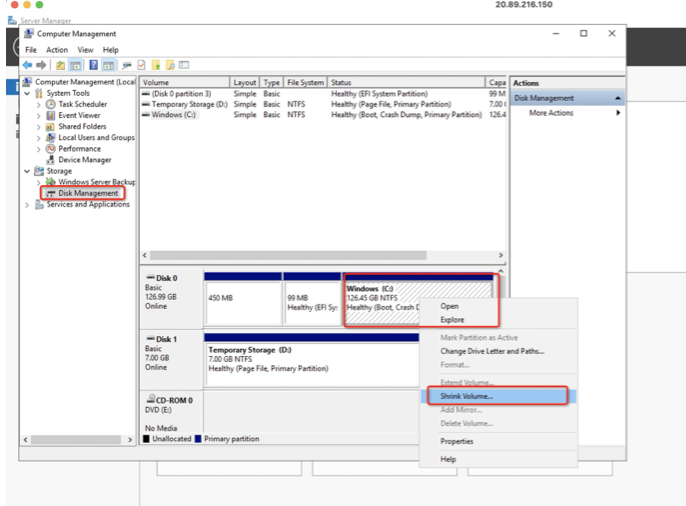
左側のメニューからDisk Management を選択し、Windows(C)を右クリックして、Shrink Vloume…を選択してクリックします。
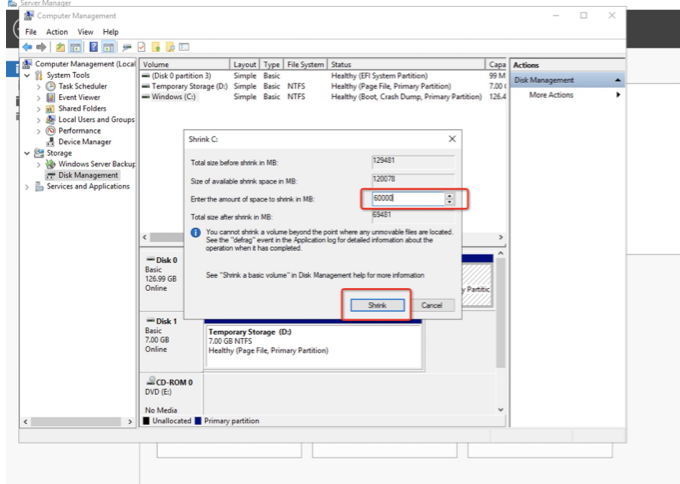
下記画像のように、赤い枠に値を入力し、Shrinkをクリックします。
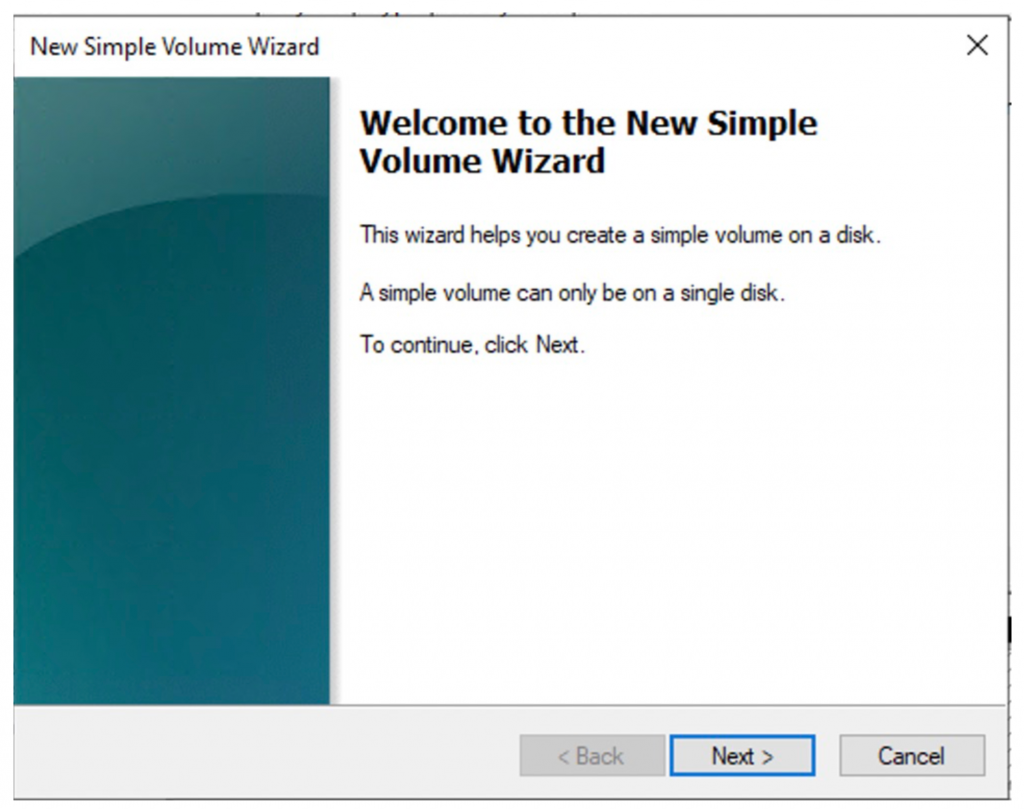
新しくできたディスクのところをダブルクリックして、New Simple Volumeを選択しクリックします。
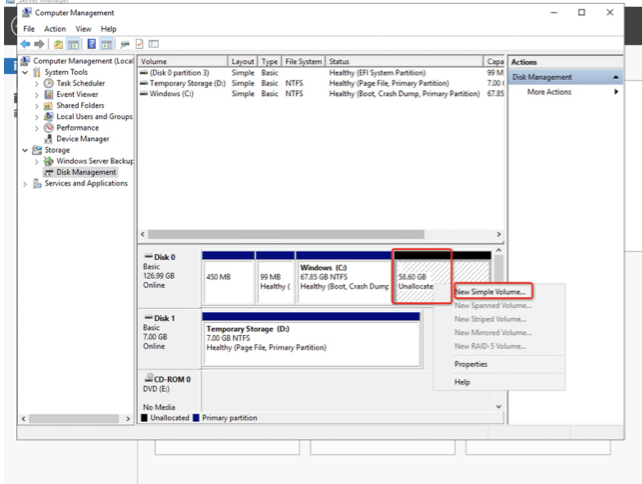
next->next….->finish
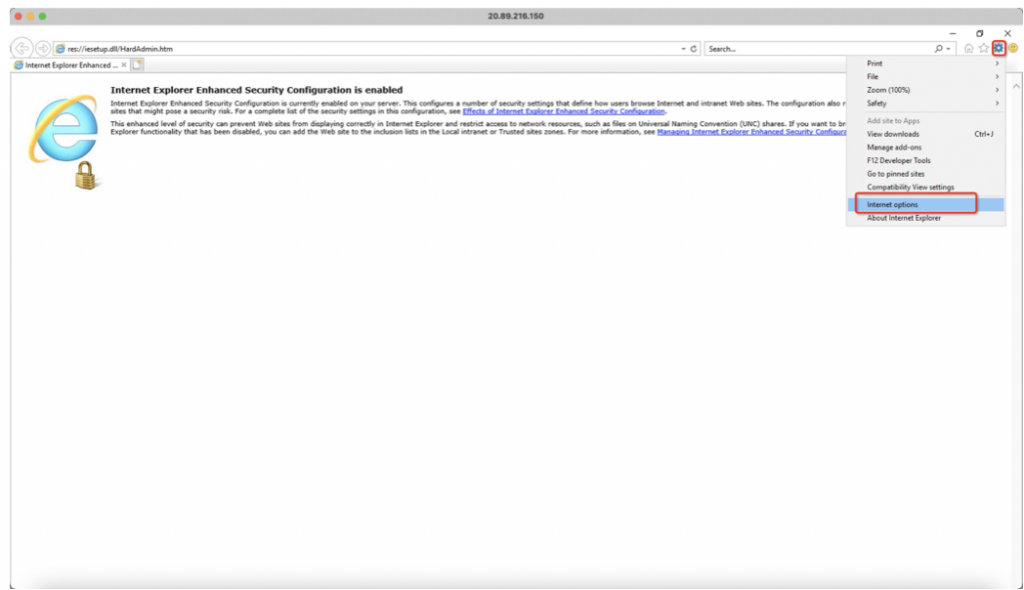
- 1.ブラウザーを設定し、ダウンロードを許可する
IEブラウザーを開いて、右上の設定マークをクリックし
internet optionを選択してクリックします。
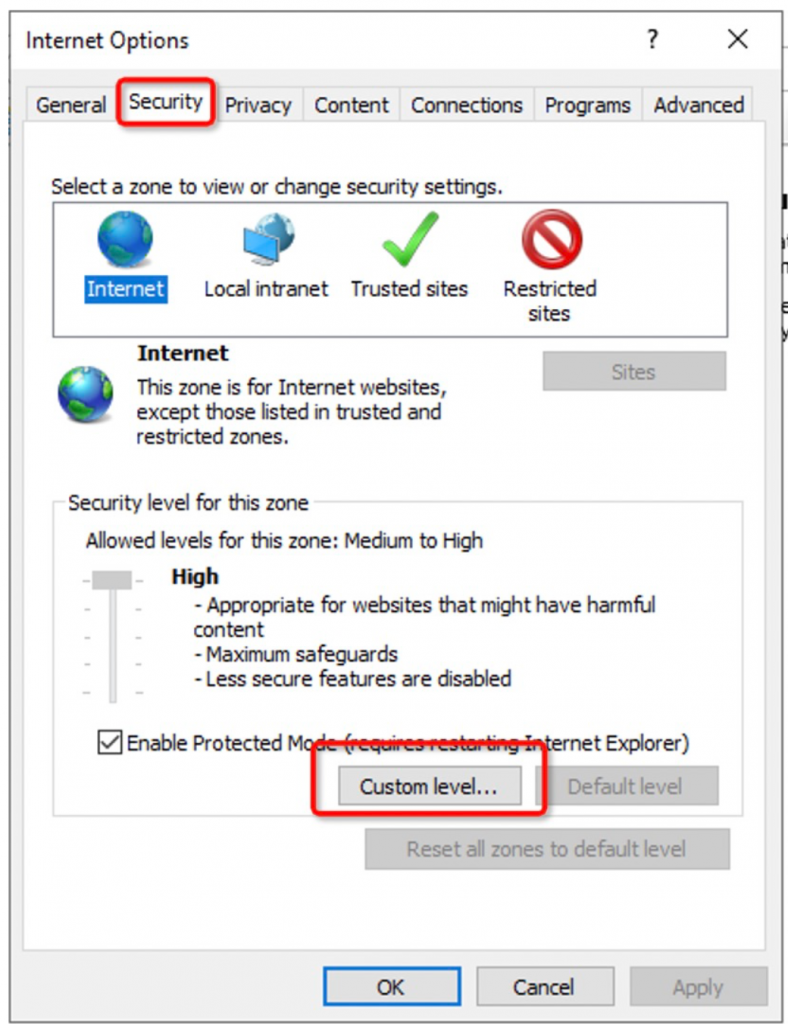
security項目を選択し、Costom level…をクリック
下記画像のように、赤い枠のところEnableを選択して、【OK】をクリックします。

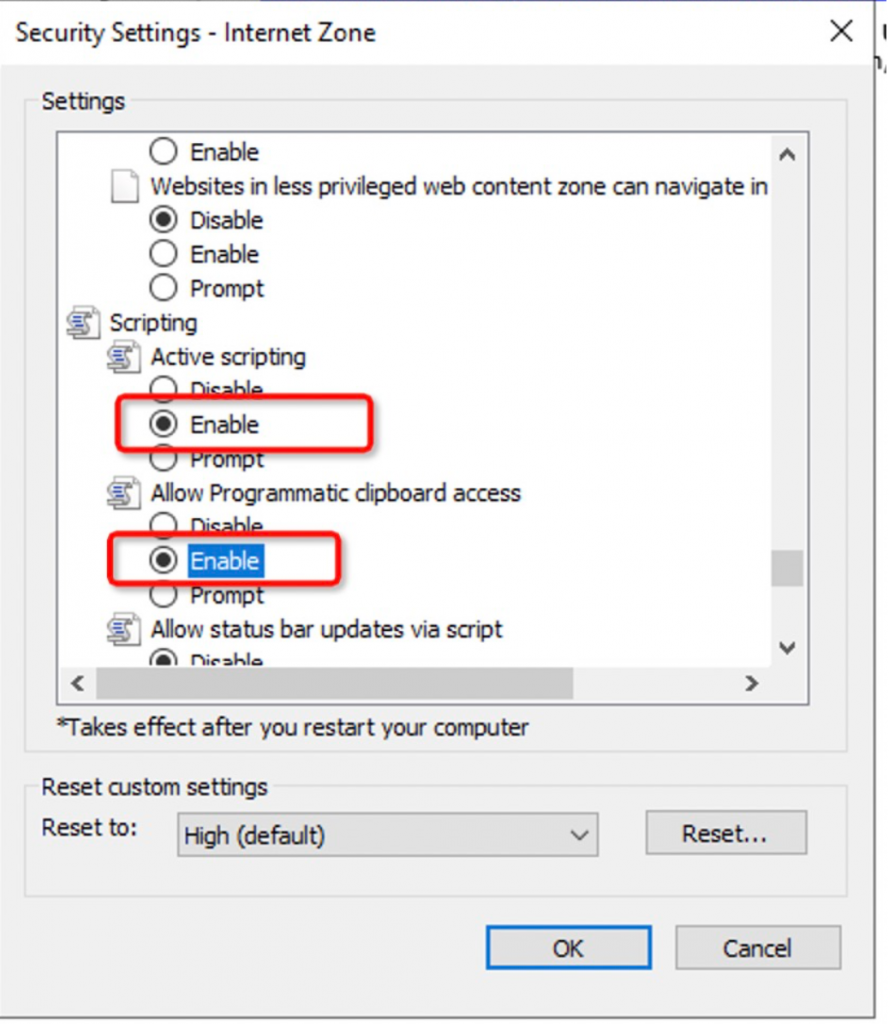
【Apply】をクリックしたあとに、【OK】をクリックします。
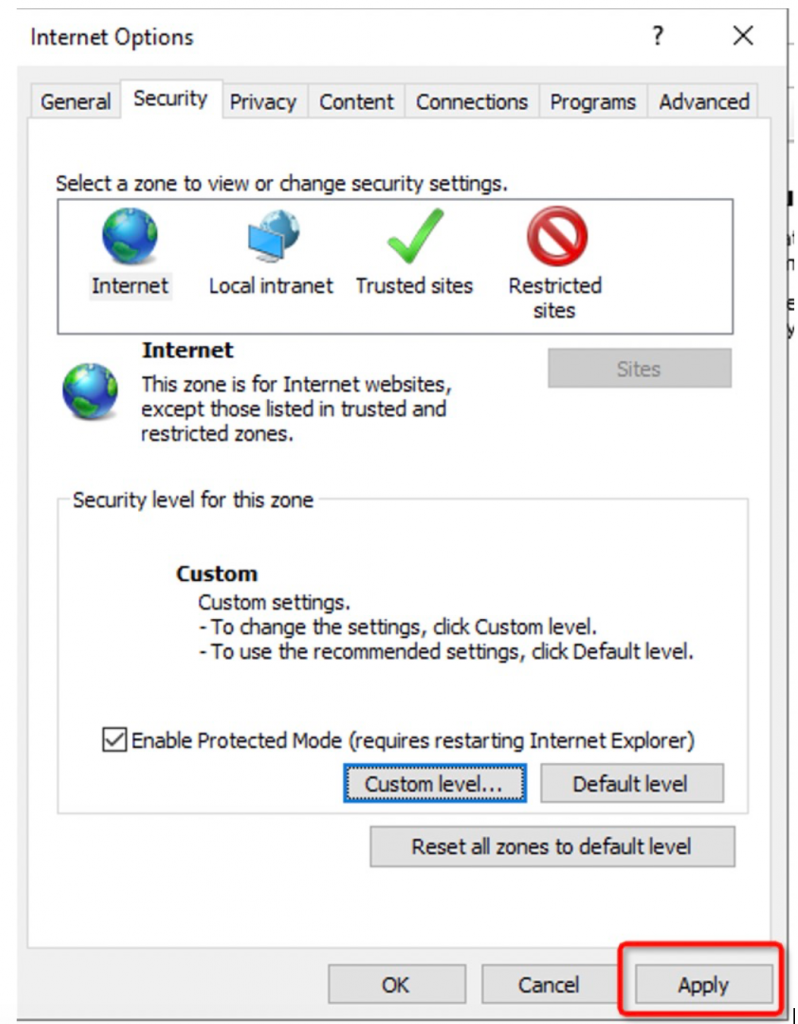
設定完了しましたら、ブラウザーを閉じます。
次にMySQLの設定をします。
ブラウザーを再度起動し、下記URLを開いてください。
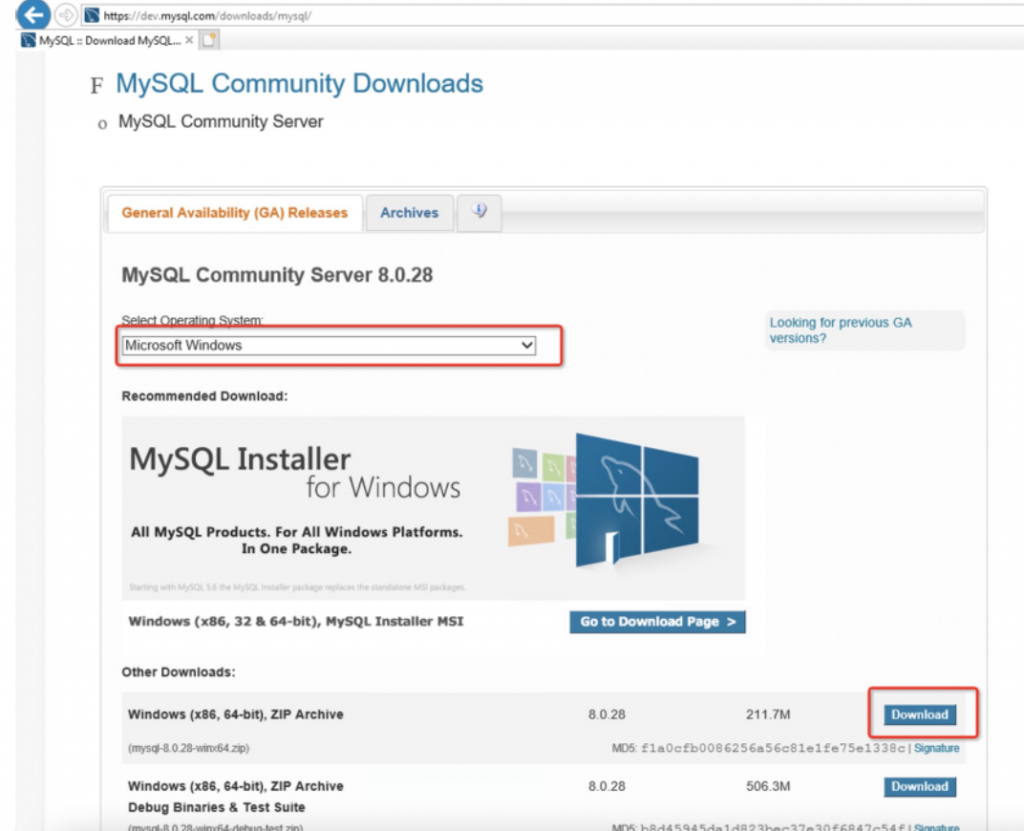
上の赤枠のメニューから Microsoft Windowsを選択して、
Downloadボタンをクリックします。
赤い枠のところの【No thanks,just start my download】をクリックします。
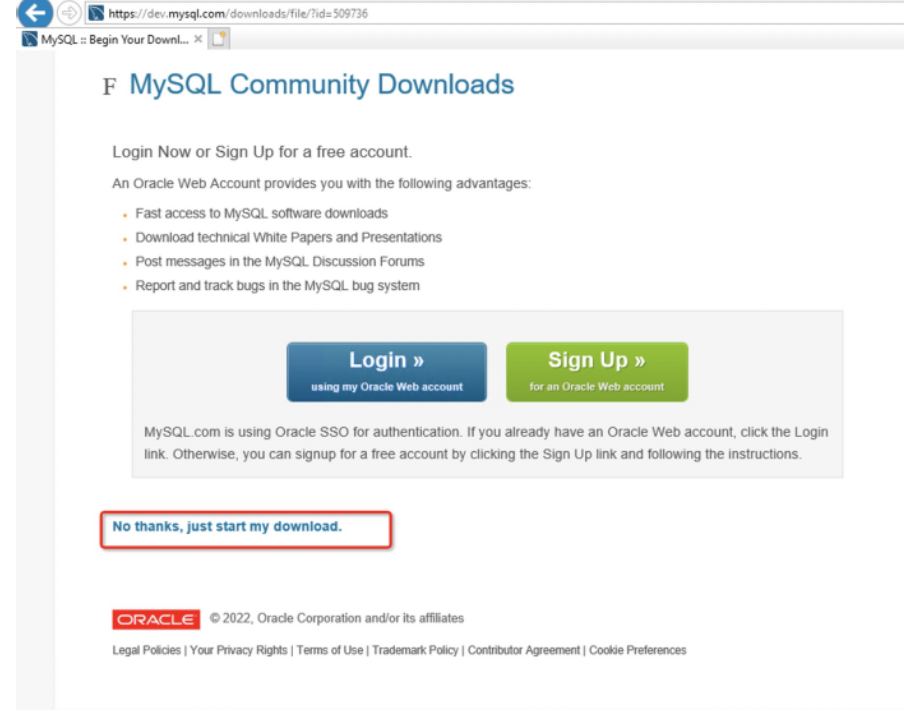
そして【Save】をクリックします。

My SQLをインストールする
ダウンロード完了後、Downloadsフォルダにてダウンロードしたファイルを見つけて、解凍します。

いずれの目次まで解凍してください。上に新しく分割したディスクまで解凍してもOKです。※注:解凍の経路ではスペースがあってはいけないです。
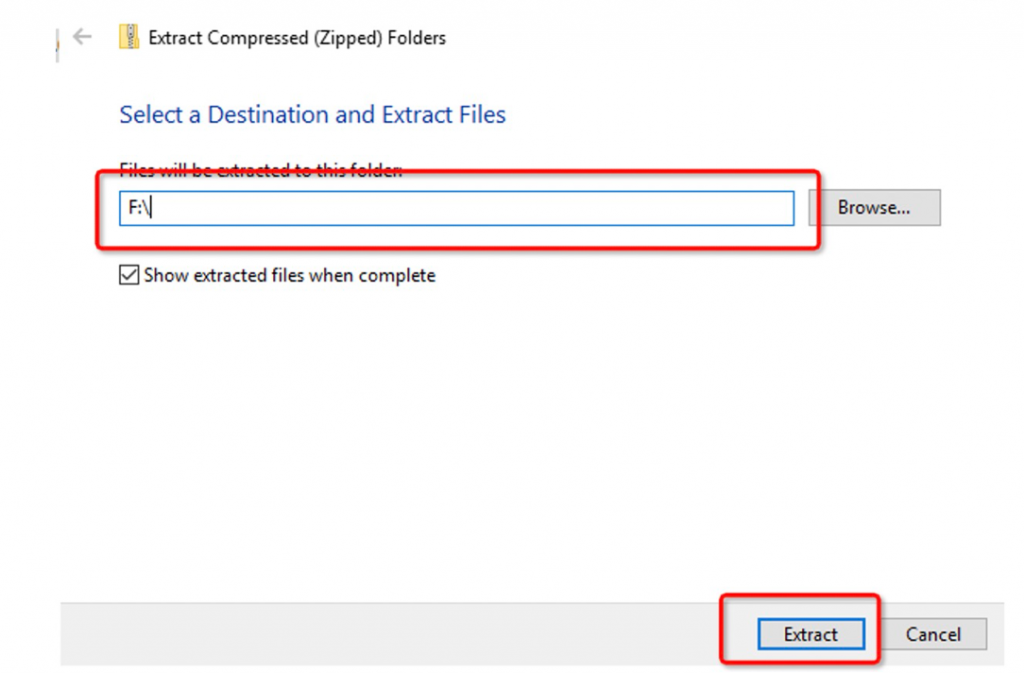
【Extract】をクリックします。
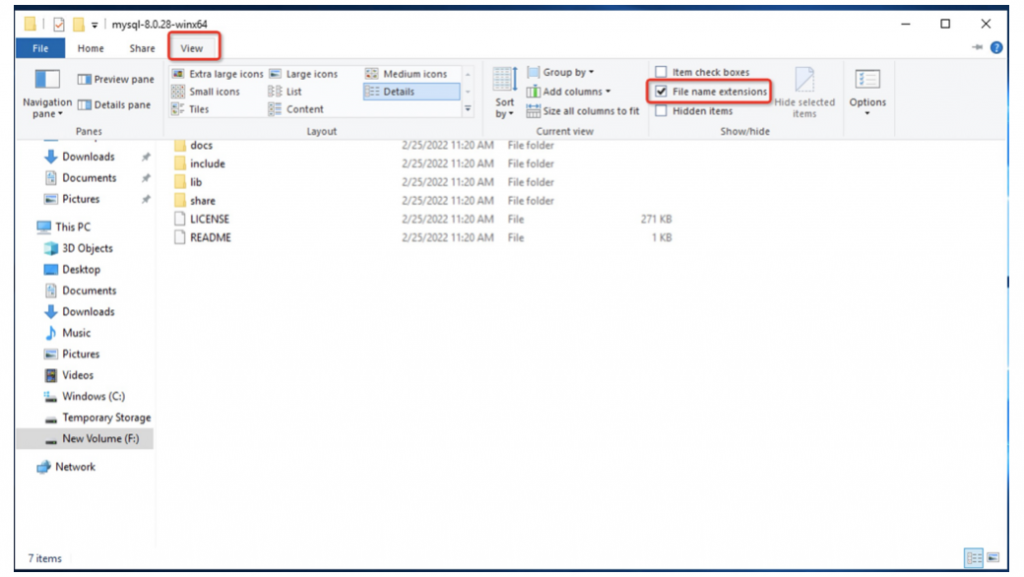
解凍した目次に入って、まずは【View】オプションして、File name extensionsをチェックします。
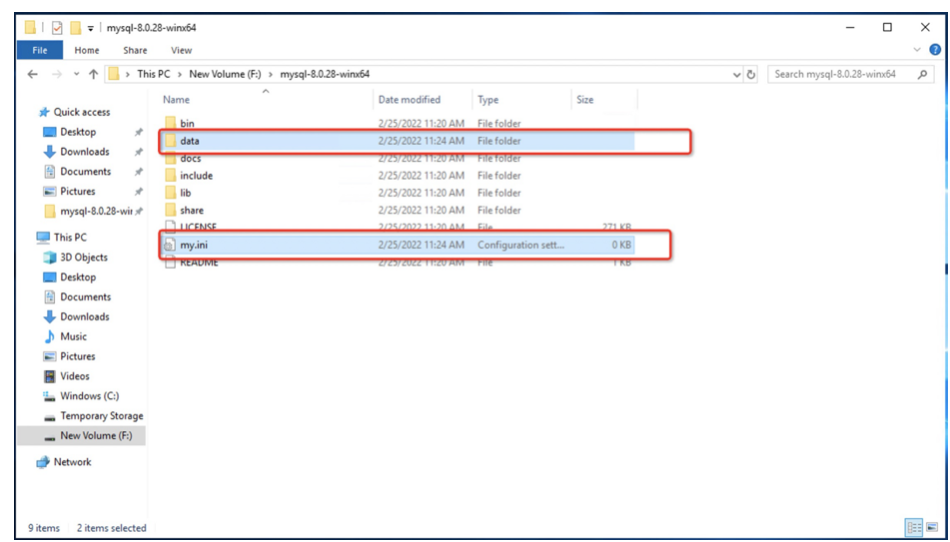
【data】というフォルダと【my.ini】というファイルを新規作成します。
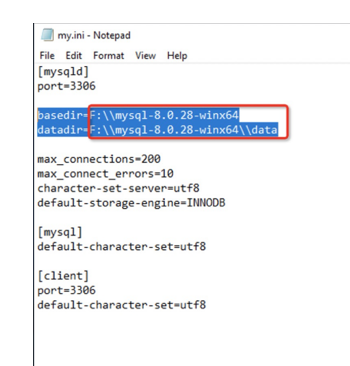
my.iniファイルをエディタします、下記内容を入力してください。
[mysqld]
port=3306

basedir=F:\\mysql-8.0.28-winx64
datadir=F:\\mysql-8.0.28-winx64\\data

max_connections=200
max_connect_errors=10
character-set-server=utf8
default-storage-engine=INNODB

[mysql]
default-character-set=utf8

[client]
port=3306
default-character-set=utf8
ここで注意なのが、
下記赤い枠のところ書く経路は解凍ファイルと同じ経路でなければなりませんので確認してください。問題がなかったら、保存してファイルを閉じます
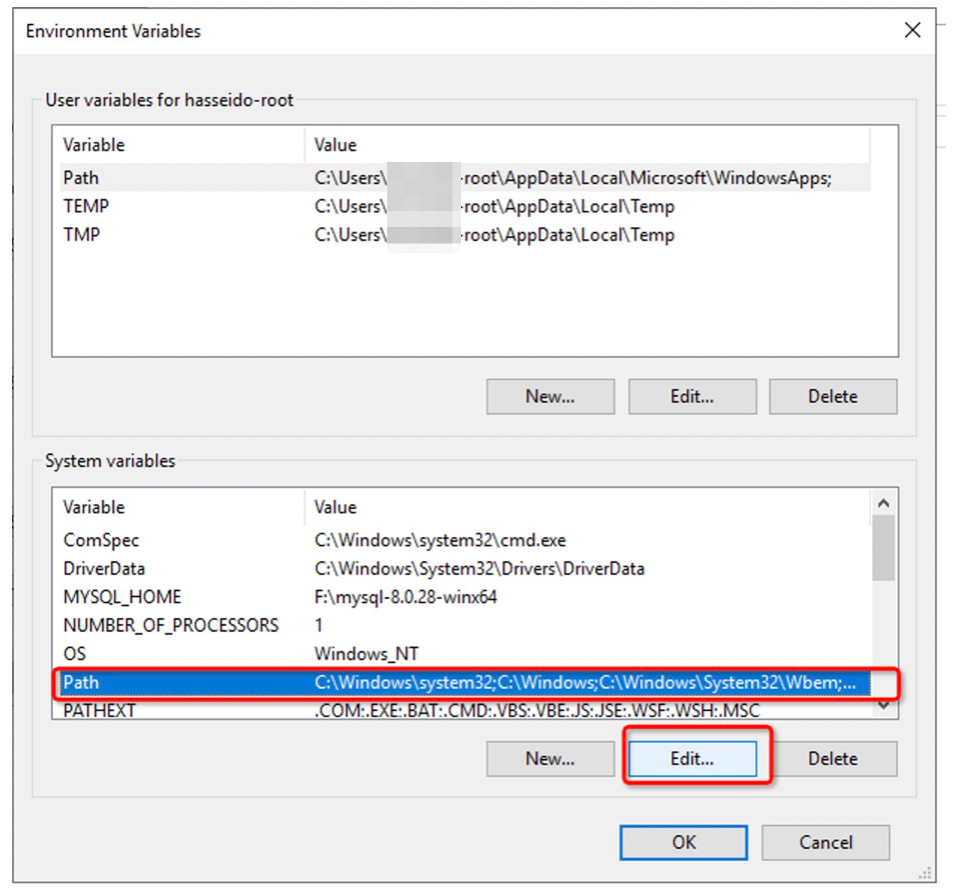
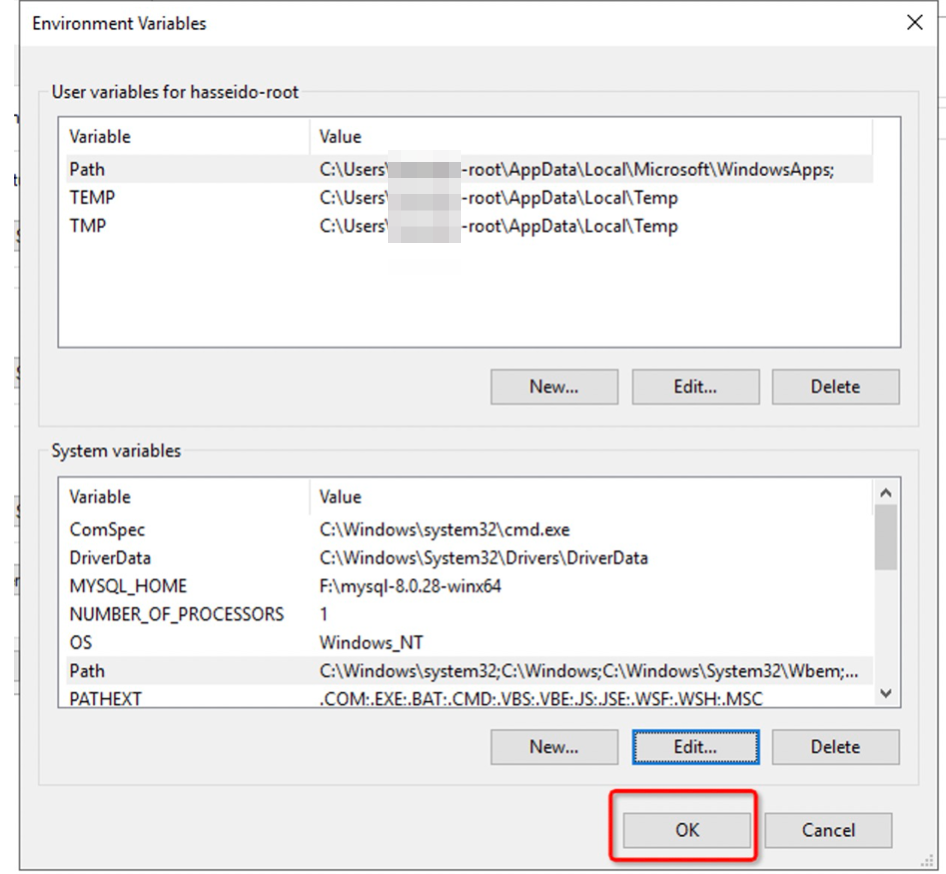
システム環境の変数を配置します。

【New】をクリックします。
下記のよう情報を入れて、【OK】をクリックします。

Pathを選択し、【Edit…】をクリックします。
【New】をクリックし、
%MYSQL_HOME%\binを入力して、【OK】をクリックします。
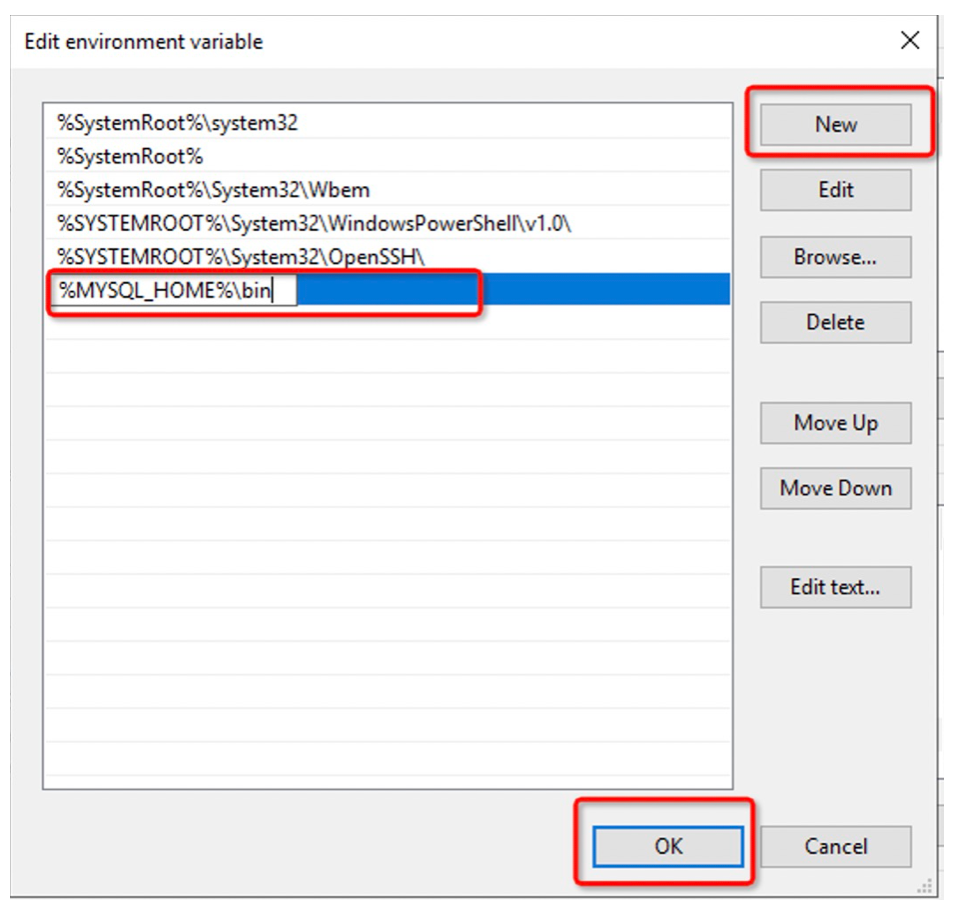
OKを推します。
次に、
StartメニューからWindows Systemしたの Command Promptを見つけて、右クリックし、Run as administratorを選択しクリックします。

解凍したファイルの目次のbinというフォルダに入ってください。
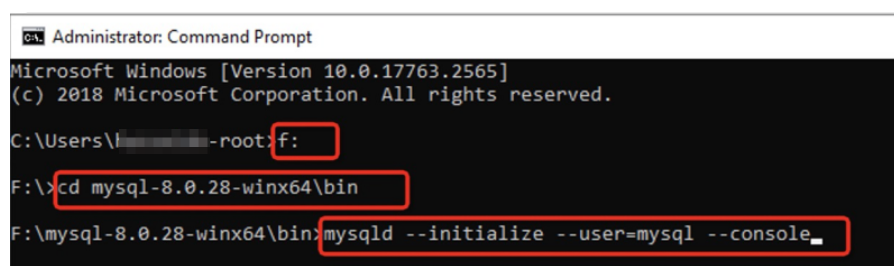
下記内容を入力してください。
mysqld --initialize --user=mysql --consoleそして、Enterキーを押します。
もしmysql.exeエラーのポップアップが出てきたら、VC++2015をインストールする必要があります。インストールの方法:https://docs.microsoft.com/en-US/cpp/windows/latest-supported-vc-redist?view=msvc-170へ移動してください。
一応VC++2015をインストールのケースもやっておきます。
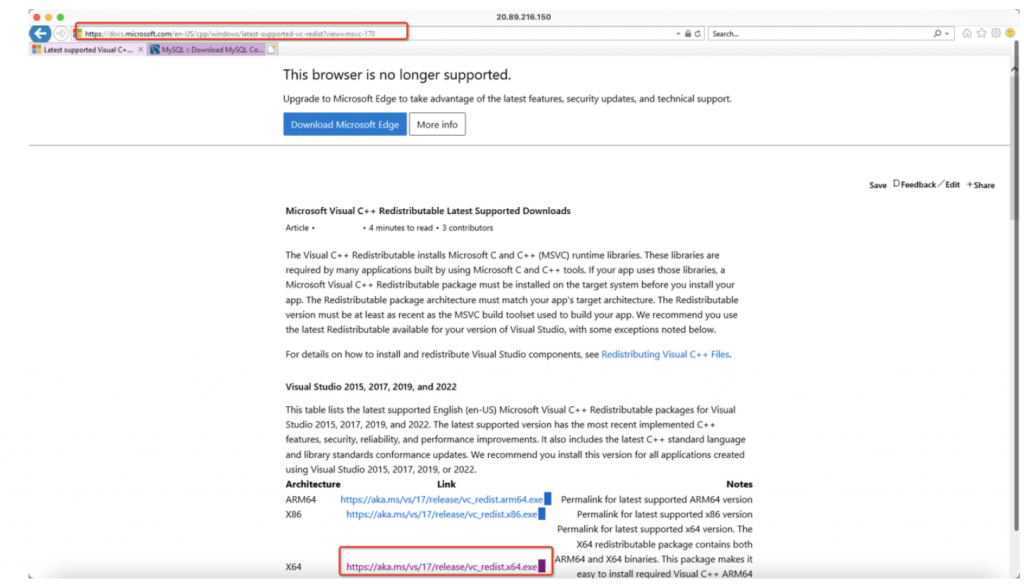
赤い枠のところをクリックし、ダウンロードしてインストールします。そして、CMDを閉じて、もう一度Run as administratorを選択する操作をします

解凍したファイルの目次のbinというフォルダに入ってください。
mysqld –initialize –user=mysql –console
mysqld -install
Service successfully installedという提示が出てきましたら、インストールが成功したということになります。
※注:↑赤い枠のところはデータベースに登録する初期パスワードです、今後登録するためにメモしておいてください。
「net start mysql」を入力して、サービスを起動します。
「mysql -u root -p」を入力して、データベースに登録します、パスワードが必要という提示がありますので、先ほどメモした初期パスワードを入力してください。
パスワード変更のコマンド:例↓
ALTER USER root@localhost IDENTIFIED BY ‘123456’;
パスワードが「123456」と変更されます。【注:これは必須ではありません】
My SQLにデーター導入する
データベースをクリエイトするコマンド:
create database hasseido default character set utf8mb4 collate utf8mb4_0900_ai_ci;だいたいこれを読んでいる人はsqlをzipでもらっていると思うので、
sqldata.zipをサーバーまでコピーして、
任意の目次に入れて、解凍してください。
そして、解凍した目次に入って、
sql.batをダブルクリックして実行してください。
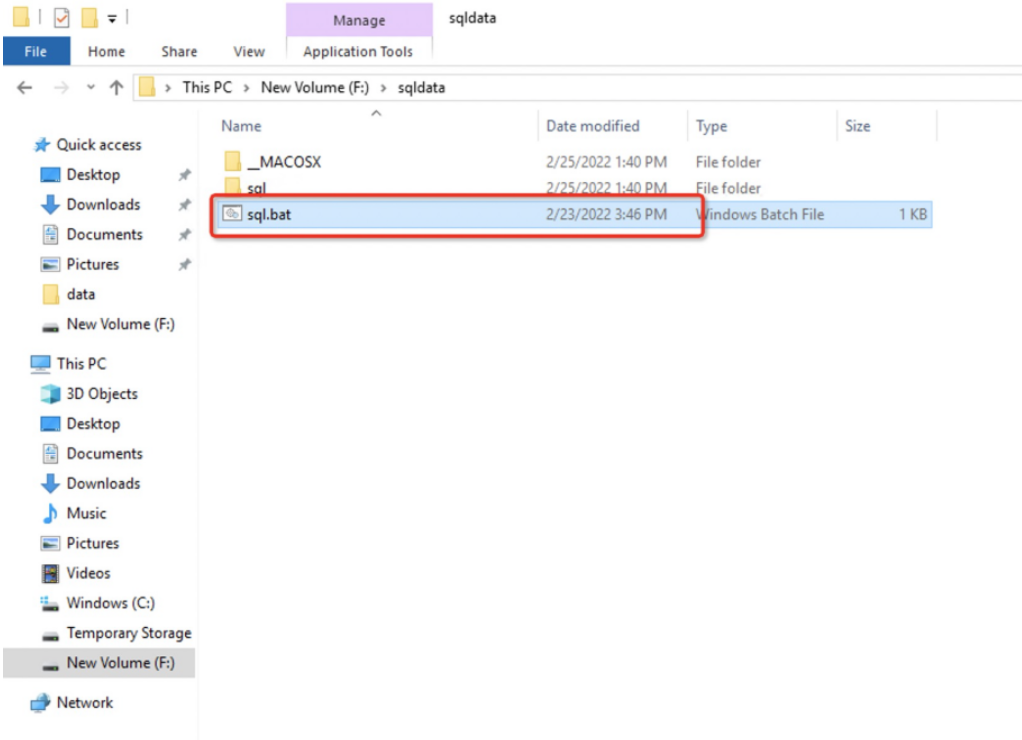
下記画面が出てきたら、順調に実行されたということになりますので
画面を閉じてください。

そして、
↓下記の画像のようにテーブルを見れるようになったら、
データベースの導入が成功したということになりますね。

サーバーにプロジェクトのソースコードを適応する
Gitをダウンロードしてみます。
ブラウザーを開いて、https://git-scm.com/download/winへいきましょう。
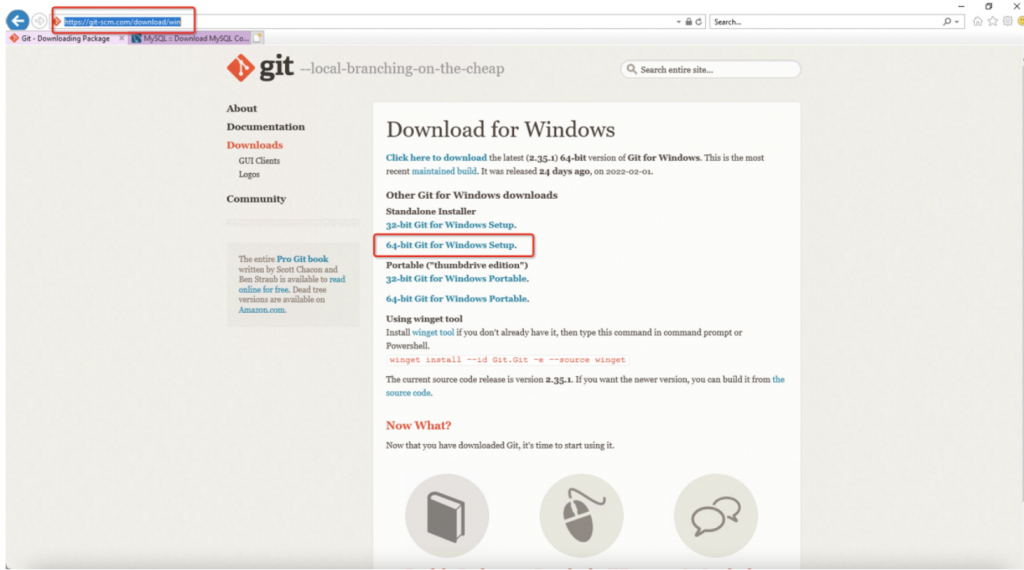
Gitをダウンロードをして、インストールしてください。
イントールはいつもの..
Next -> Next ->…… -> Install -> finish
の連発で大丈夫です。
gitは大丈夫かと思いますが、
一応今回のユーザのsshキーをうけとって、
.sshフォルダを C:\Users\XXX-root ディレクトリの中に置いておく前提としましょう。
前に、作ったディスクを開き、
ルートディレクトリにて[data]というフォルダを新規作成します

dataに入って、[app] というフォルダを作成します。
そしてそのappのフォルダに入って、
空白のところで右クリックし、Git Bash Hereを選択してクリックします。
そしてgit bashを開いたら…
連携を受けているgitのURLからクローンをしてください。
git clone git@github.com:XXXX/XXXX.git
まぁクローンはみなさん死ぬほどやってると思うので、大丈夫だとは思います。
サーバーにてIISを配置する
server managerを開いて、赤い枠のところをクリックしてください。

【Next】をクリックして、Select server rolesの画面まで行ってください。
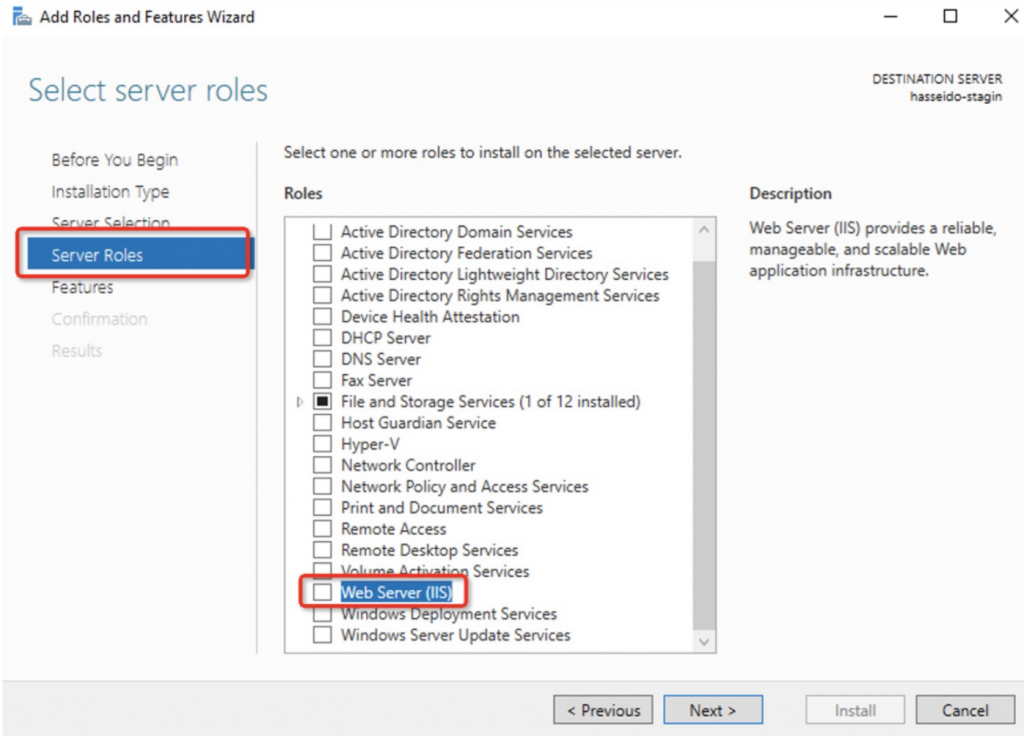
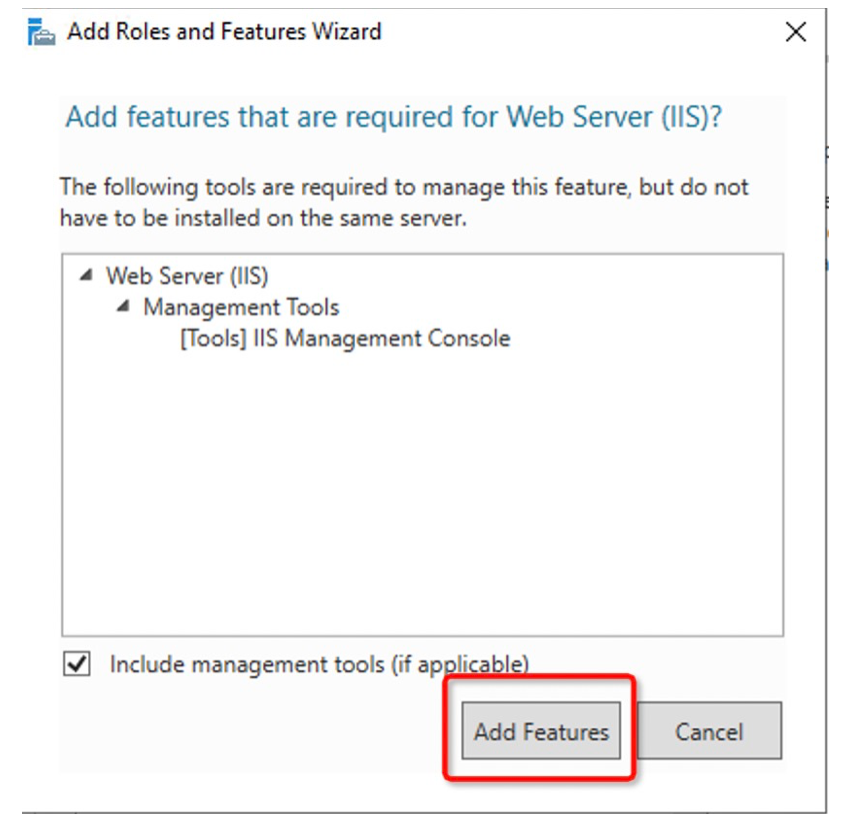
web server(IIS)をチェックして、【Next】をクリックしてください。
【Add Features】をクリックしてください。
そしていつものnextラッシュで、
-> next -> next … -> installを順番に押してください。
インストールが成功しましたら、【Close】をクリックしてください。
これで終わりです。
dotnet 3.1をインストール
ブラウザーを開いて、下記URLへ。
https://dotnet.microsoft.com/en-us/download/dotnet/3.1

赤い枠のHosting Bundleをクリックしてダウンロードします。
Hosting Bundleをインストールします。
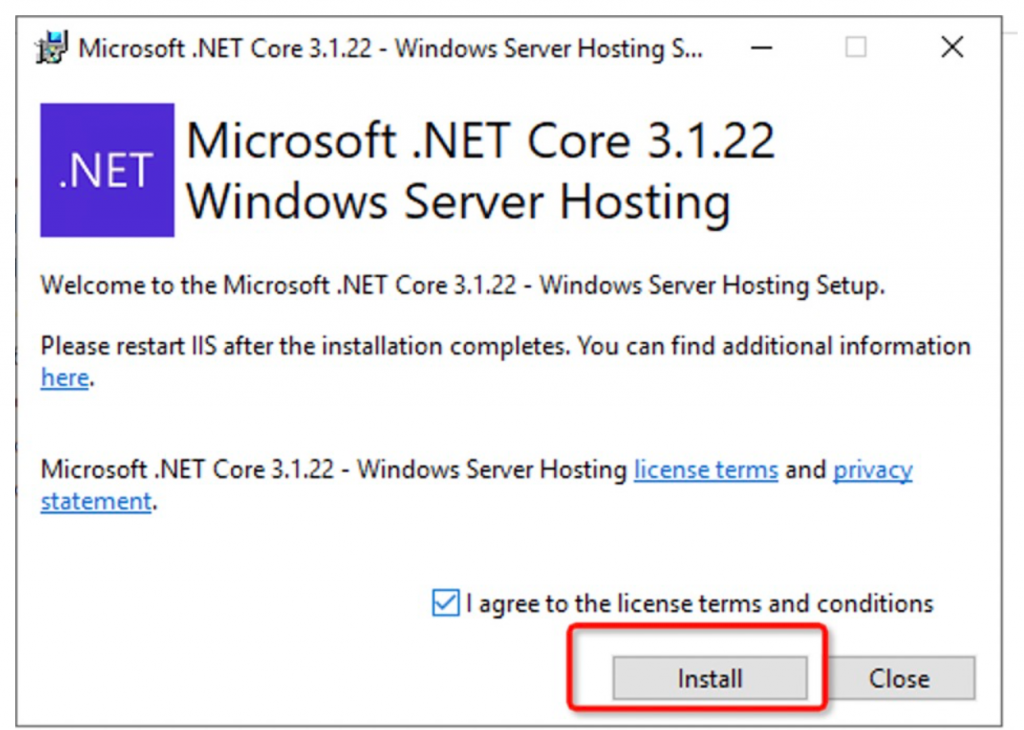
【Install】をクリックインストールしてから、【Close】をクリックして閉じます。
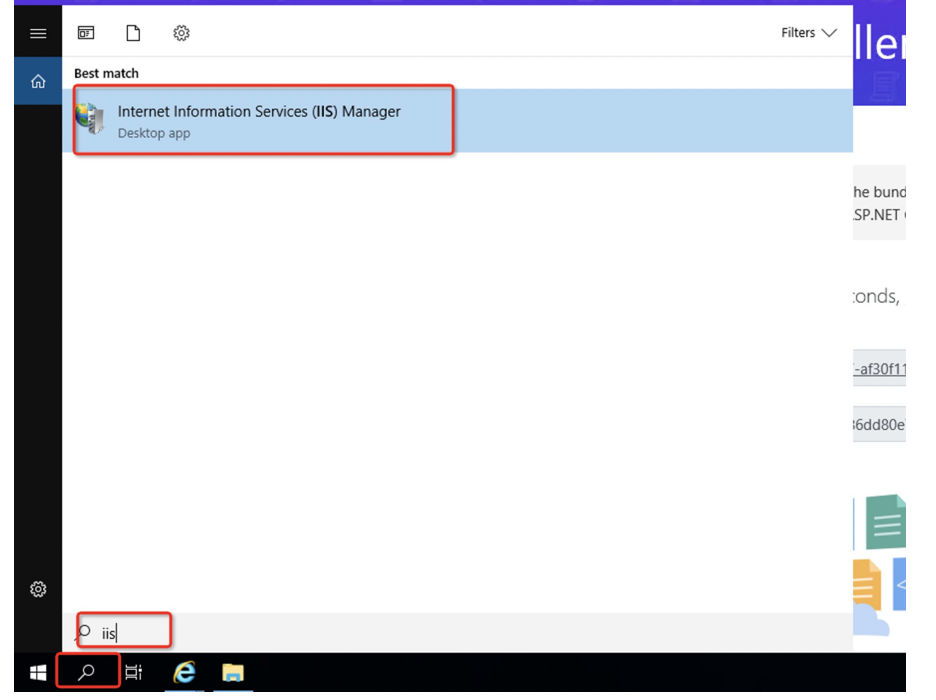
IISを配置
検索マークを押して、IISを入力し検索で出てきたら選択してクリックします。
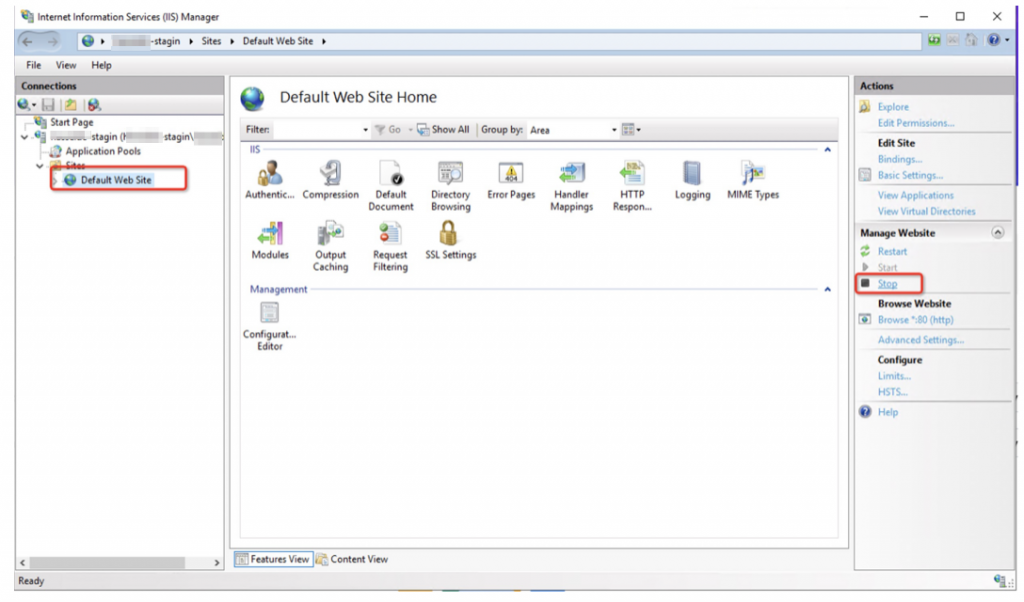
左側のメニューを展開して、default web siteを選択し、右側のStopをクリックします。
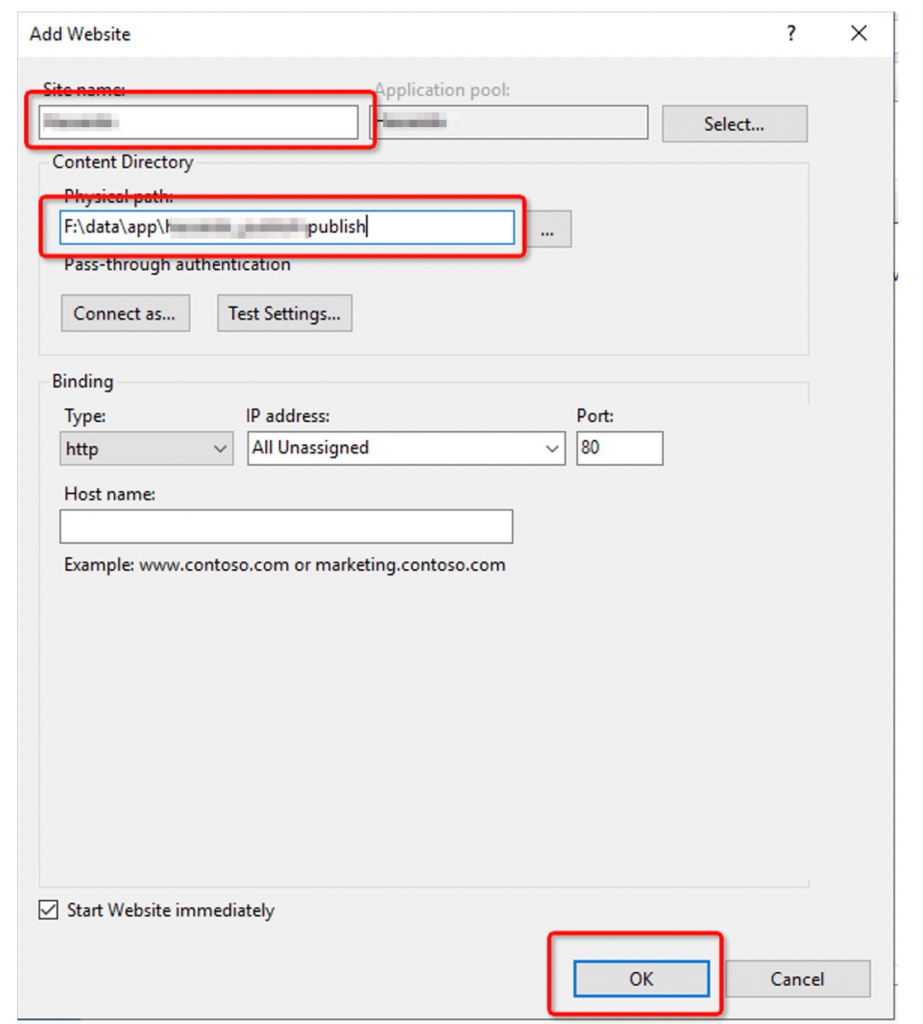
左側のメニューからSitesを選択し、右側のAdd Website…をクリックします。
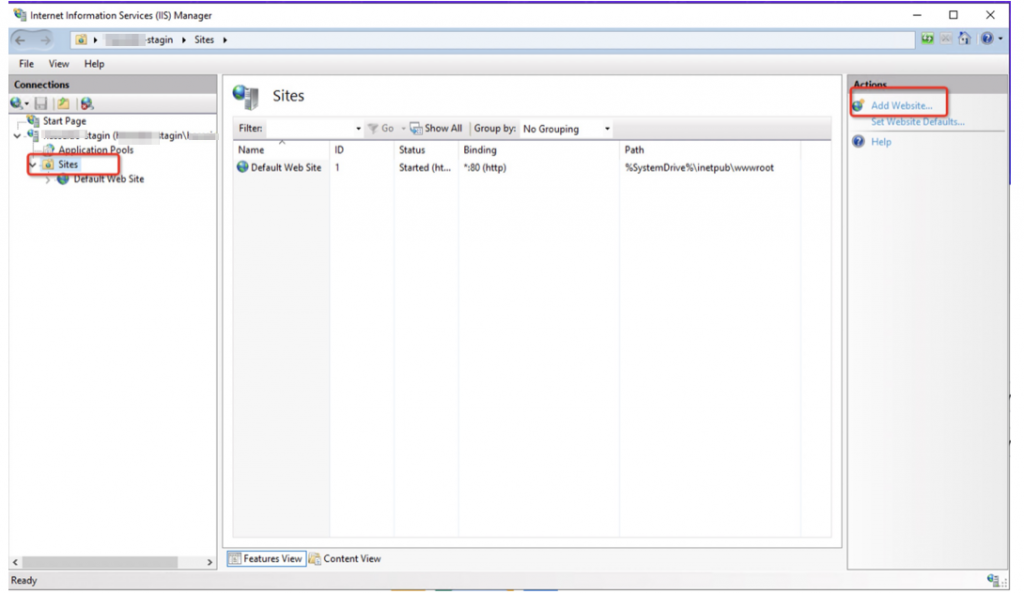
下記画面のように、情報を入力し、【OK】をクリックします。
※注:Physical pathは先ほど作成したgitディレクトリ中のpublishフォルダのパスとなります。
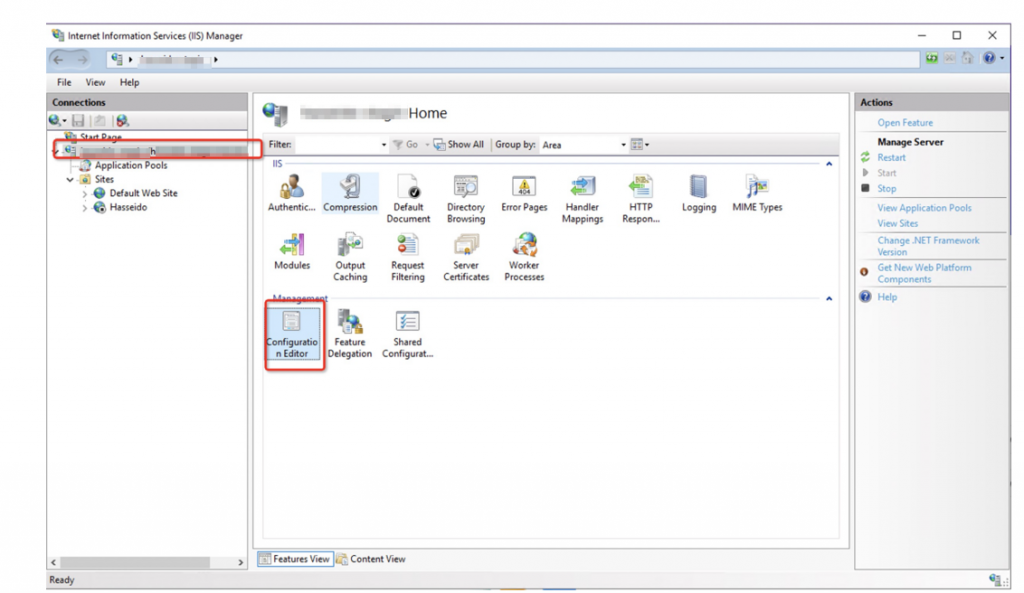
右側のメニューから自分できめたプロジェクト名を選択して、
configuration editorをダブルクリックします。
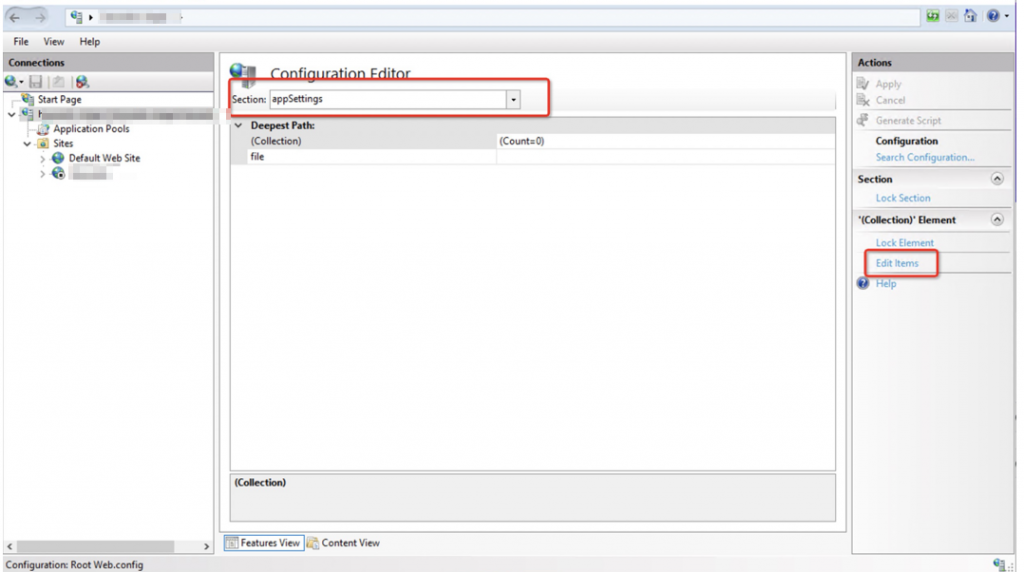
プルダウンボタンをクリックして、
【app setting】を選択し、右側のEdit Itemsをクリックします。
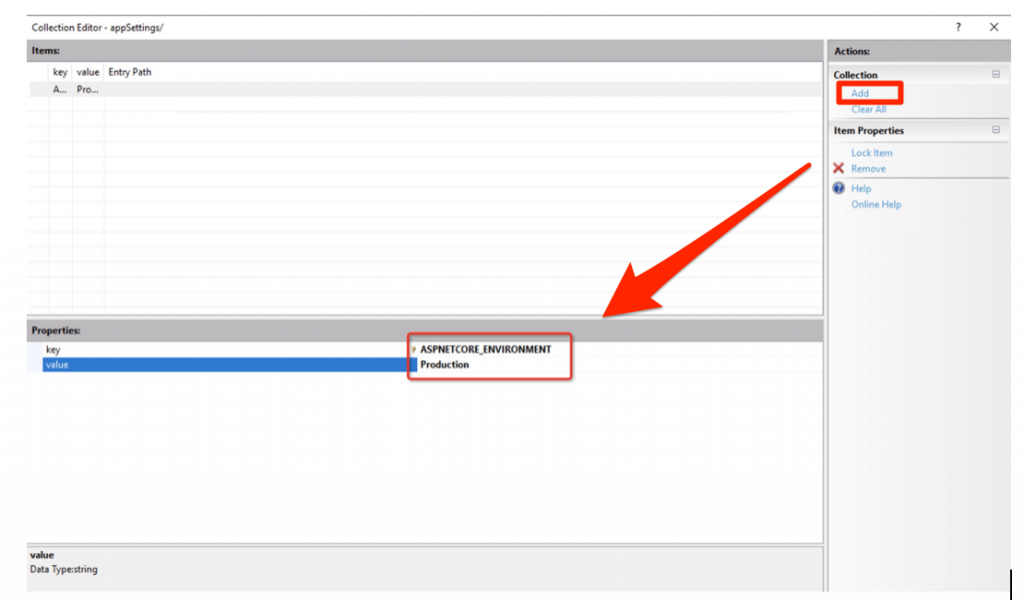
【Add】ボタンをクリックします。
keyとvalueを入力してください。
key: ASPNETCORE_ENVIRONMENT
value: Production
入力できましたら、マウスを移動して空白のところでワンクリックしてから、右上の×をクリックしてクローズしてください。
そして、右側の【Apply】をクリックしてください
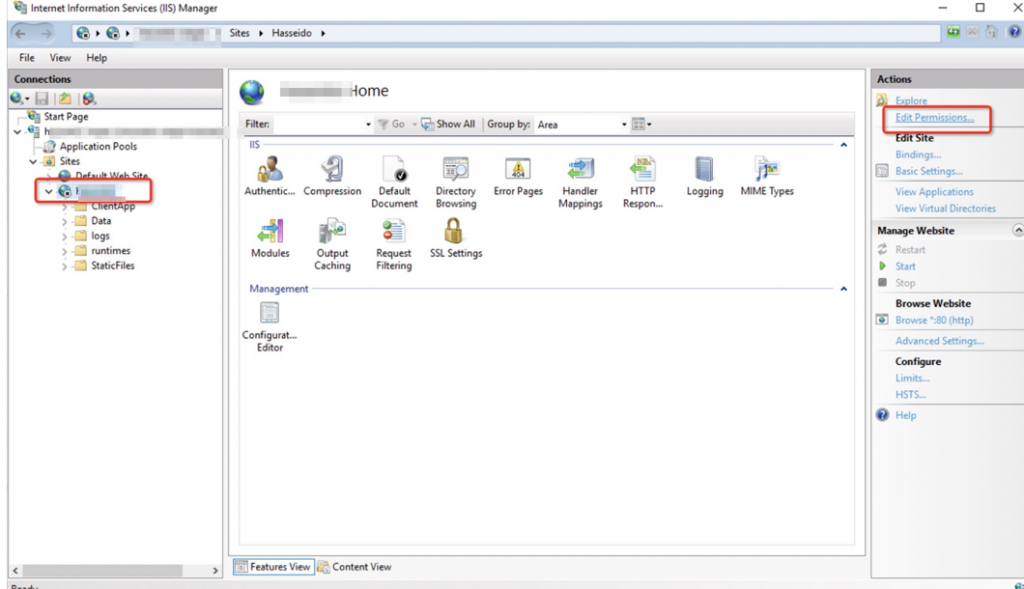
IISの権限を設定
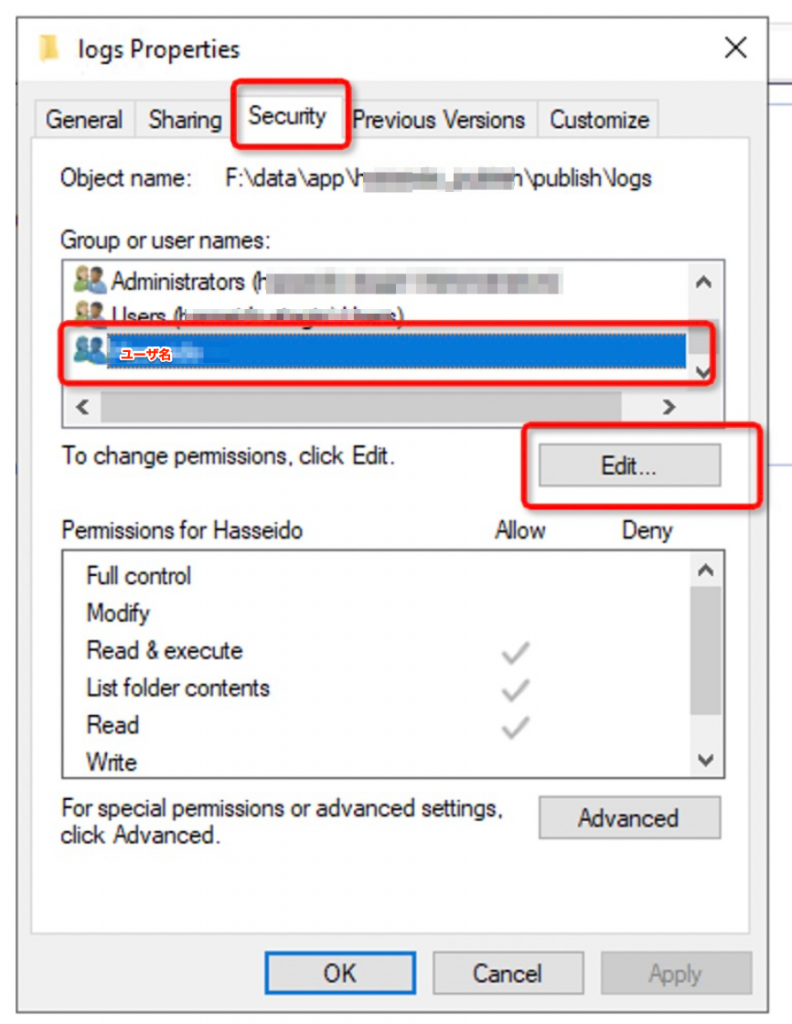
左側のメニューから自分のプロジェクト名を選択し、右側のEdit Permissions…をクリックします。
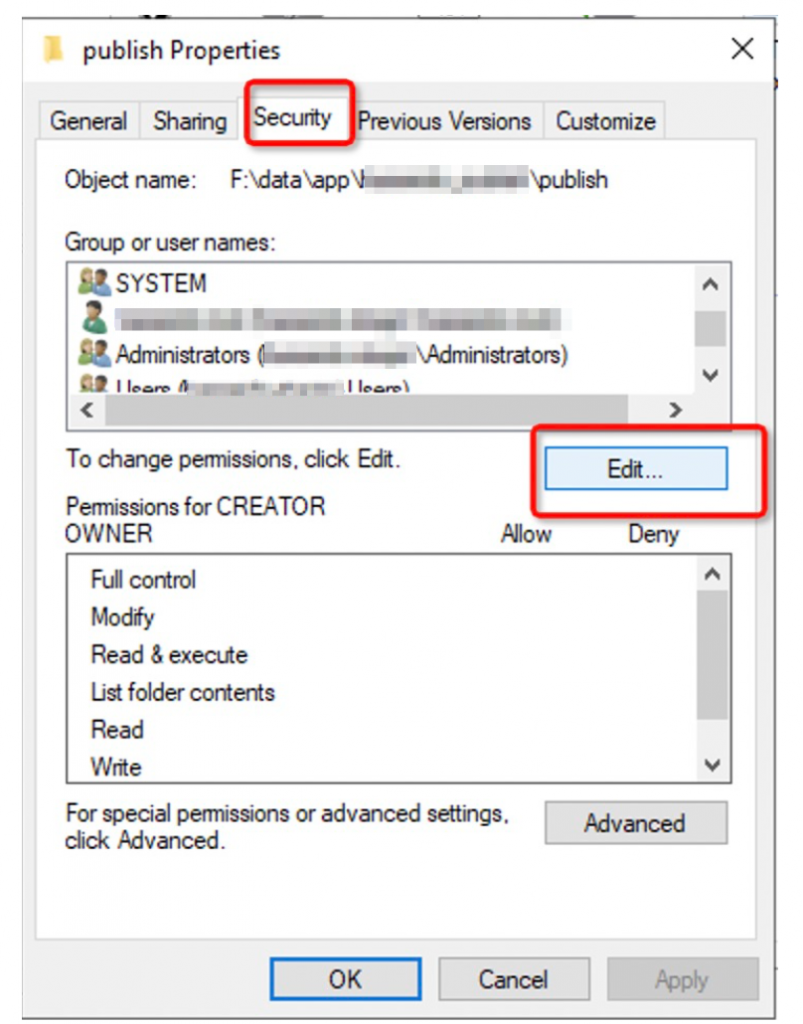
securityのオプションで、【Edit】をクリックします。
【Add…】ボタンをクリックします。
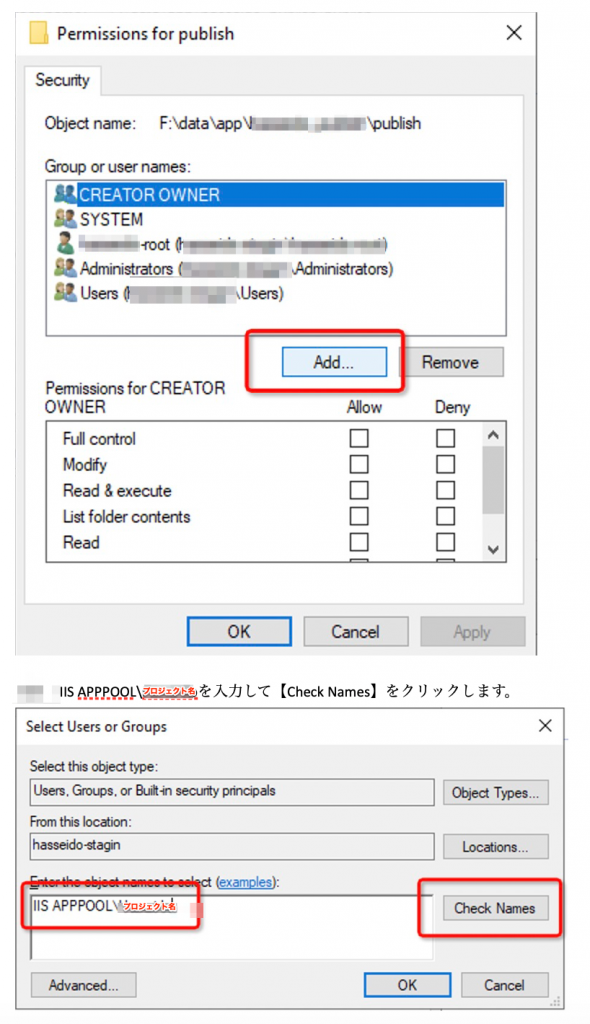
ユーザが追加されていることを確認したらOKをおします。
そしたら次に
このようにedit persmissionをクリックした後に…
securityオプションで、先ほど追加したユーザーを選択し、【Edit】ボタンをクリックします。
そして、
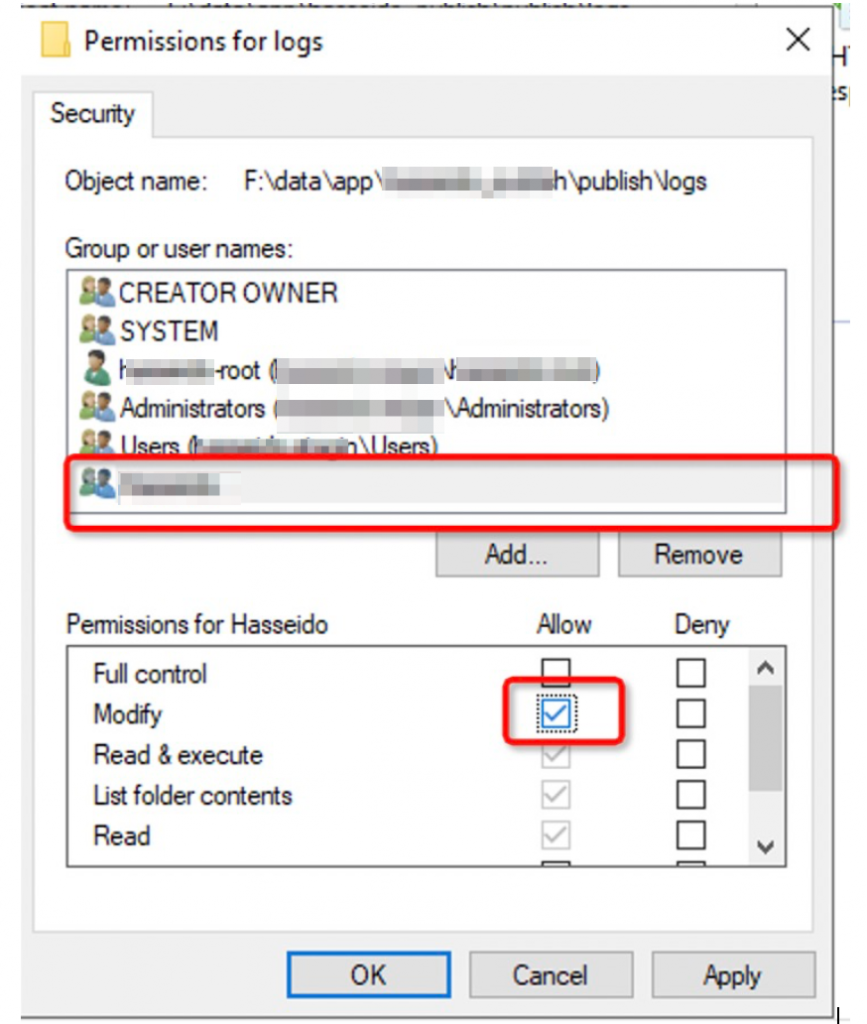
再度自分が作ったユーザーを選択し、
下のModifyをチェックして、【Apply】をクリックしてから、
【OK】をクリックします。
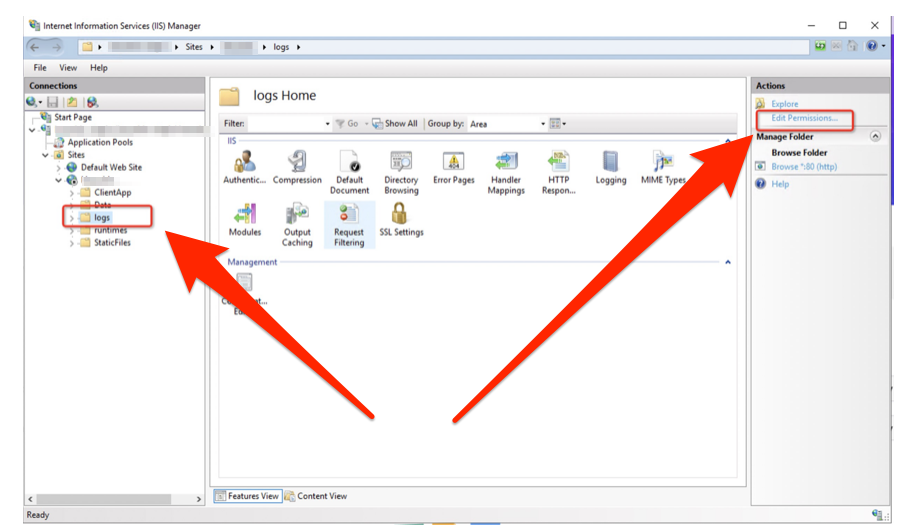
次にstaticフォルダにも権限を与えます。
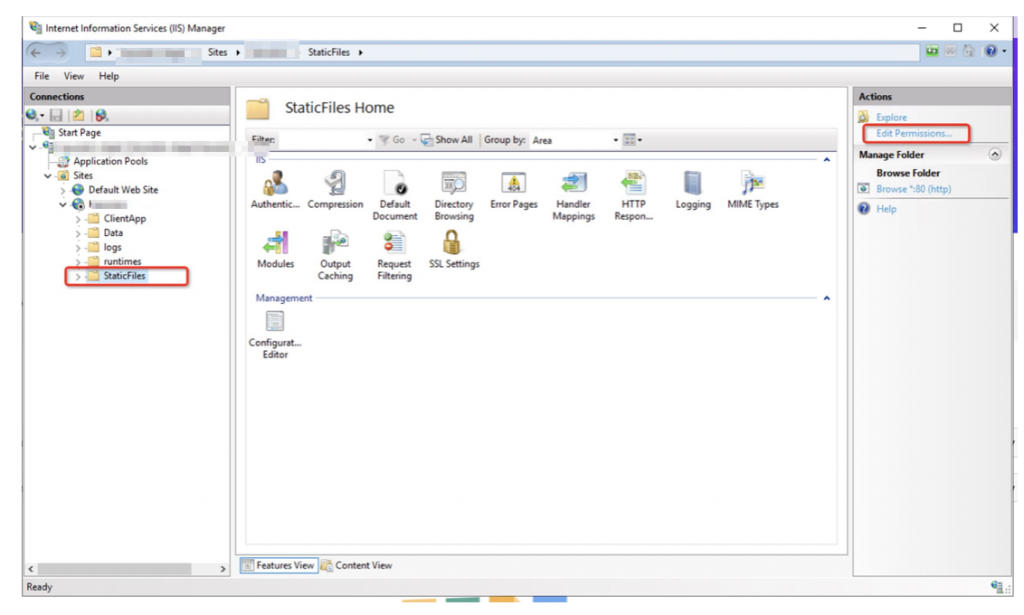
左側のメニューからStaticFilesフォルダを選択し、
右側のEdit Permissionsをクリックします。
前のステップと同じような操作を行い、
自分が作ったユーザーに該当フォルダのModify権限を与えます。
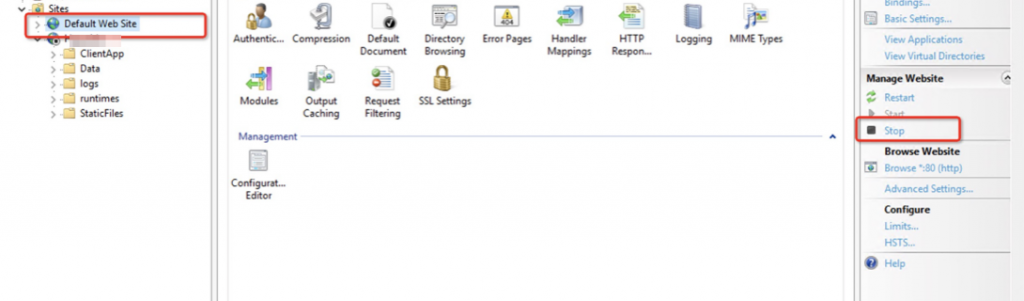
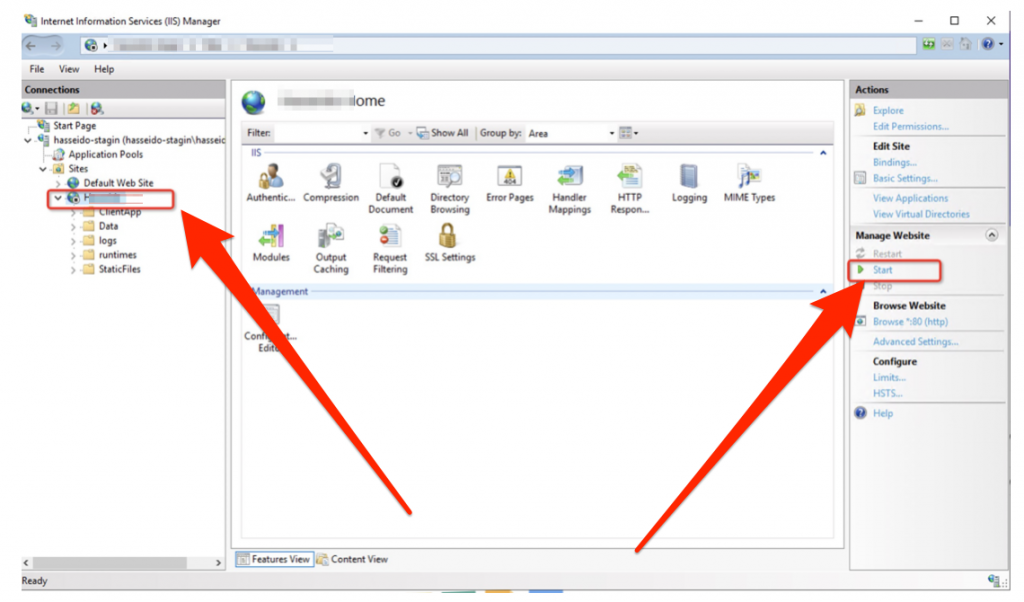
最後に、IISを起動する
左側のメニューからdefault web siteを選択し、
右側のstopをクリックします。
※注:デフォルトでdefault web siteと自分で作ったプロジェクトが
共通でポート80を使用しているので、デフォルトはstopにしてください。
ここでdefault web siteがstopの状態であることは、
再度確かめる必要はあります。
そして最後に、、、
左側から自分のプロジェクトを選択し、右側のstartをクリックします
ここまでで、テスト環境の構築が完了します。
ローカル環境からブラウザーを開いて、
サーバーアドレス(例:***.***.***.***/XXX/)等を入力して、
画面が表示しましたら、サーバーの構築が成功したということになります。
長かったですね。
途中5回くらい書くのをやめようと思いました。